If you’re looking to learn how to use a rotary tattoo machine, you’re in the right place. In this step-by-step guide, we’ll explain the basics of using a rotary tattoo machine, as well as provide some tips and tricks to help you get the most out of your tattooing experience. We’ll cover everything from setting up your machine to cleaning it after use. With this knowledge, you’ll be able to confidently use a rotary tattoo machine and start creating stunning tattoos.
Contents
What is a Rotary Tattoo Machine?
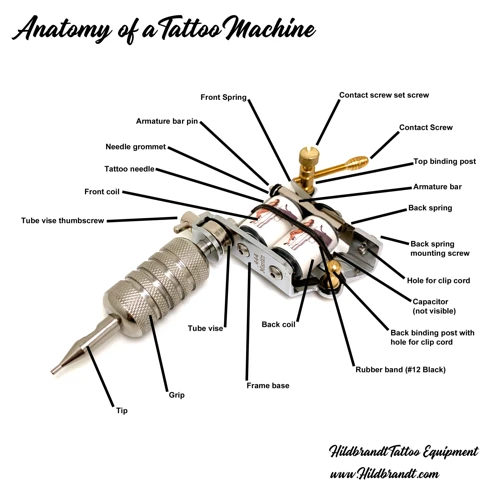
A rotary tattoo machine is a power tool used by professional tattoo artists to create permanent designs on the skin. It is designed to be lightweight and easy to control, and is powered by an electric motor. A rotary tattoo machine operates in a continuous cycle of up-and-down movements, which helps to create a consistent and precise tattoo. The machine is equipped with a needle that vibrates as it is inserted into the skin, causing the ink to penetrate the skin and create a permanent design. The machine can be used to create both traditional and modern tattoo designs, and is capable of creating a wide variety of styles and effects.
How to Use a Rotary Tattoo Machine
Using a rotary tattoo machine is a straightforward process that requires some basic safety precautions. Before using the machine, the tattoo artist should sanitize their hands and the area of the skin where the tattoo will be applied. The machine should also be sanitized, and the needle should be changed after each use. The artist should then set up the machine, connecting the power supply and adjusting the needle depth and speed as needed. Once the machine is set up, the artist can begin creating the tattoo design. The artist will move the machine in a continuous up-and-down motion to create the design, and can use different techniques to create different effects. Finally, the artist should clean and sanitize the area once the tattoo is complete.
Preparing the Tattoo Machine
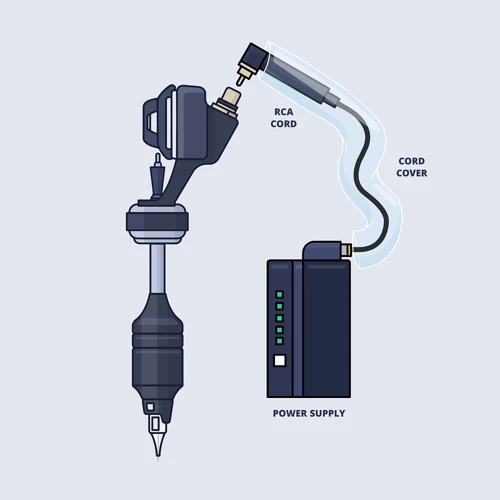
Before you can start using the tattoo machine, it must be properly set up and prepared. To do this, begin by gathering the necessary equipment and supplies, such as a power cord, foot pedal, clip cord, rubber bands, and ink cups. Next, you will need to assemble the tattoo machine. This includes connecting the power cord to the machine, attaching the foot pedal, and connecting the clip cord. Then, secure the rubber bands around the armature bar and tighten them to the desired tension. Finally, attach the ink cups to the machine, fill them with the chosen ink, and you’re ready to start tattooing.
| Equipment/Supplies | Instructions |
|---|---|
| Power cord | Connect to the machine |
| Foot pedal | Attach to the machine |
| Clip cord | Connect to the machine |
| Rubber bands | Secure around the armature bar and tighten to desired tension |
| Ink cups | Attach to the machine and fill with chosen ink |
Preparing the Needles
- Disinfecting the Needles: Before using any needles, it is important to disinfect them using a disinfectant solution. This helps to reduce the risk of infection and spread of disease.
- Testing the Needles: After disinfecting the needles, it is important to test them to make sure that they are ready to be used. This can be done by testing the needles on the arm or leg of the tattoo artist to make sure that the needles are working properly.
- Sharpening the Needles: It is important to make sure that the needles are sharpened before use. This helps to ensure that the needles can penetrate the skin properly and create smooth lines. It is also important to make sure that the needles are sharpened regularly to maintain a consistent level of sharpness.
- Grouping the Needles: It is important to group the needles according to the size and type of tattoo being done. This helps to ensure that the needles are used correctly and that the correct amount of ink is used for the tattoo.
Preparing the Ink
- Choose the ink. Select the type of ink you would like to use. Various colors and brands are available, so experiment to find out which works best for you.
- Mix the ink. Follow the instructions on the back of the ink bottle to make sure you mix it correctly. Different brands of ink may have different mixing instructions.
- Prepare the needles. Take the needles and dip them in the ink. Make sure they are completely covered in the ink before using them.
Preparing the Skin
- Clean the area: Wash the area to be tattooed with an antibacterial soap and allow it to dry.
- Shave the area: Remove any hair from the area to be tattooed with a fresh, sterile razor.
- Apply a stencil: Place a stencil of the design on the skin and trace the design with a stencil marker.
- Wipe the area: Wipe the area with rubbing alcohol to prepare the skin for the tattoo.
- Apply a lubricant: Apply a thin layer of a lubricant such as Vaseline to the area to reduce friction and make the tattooing process easier.
Starting the Tattoo
- Clean and Prepare the Skin: Make sure you have sanitized your equipment and that your workspace is clean. Shave the area to be tattooed and use a skin prep solution to remove any oils or dirt from the skin.
- Transfer the Design: Use a stencil transfer solution or transfer paper to transfer the design onto the skin.
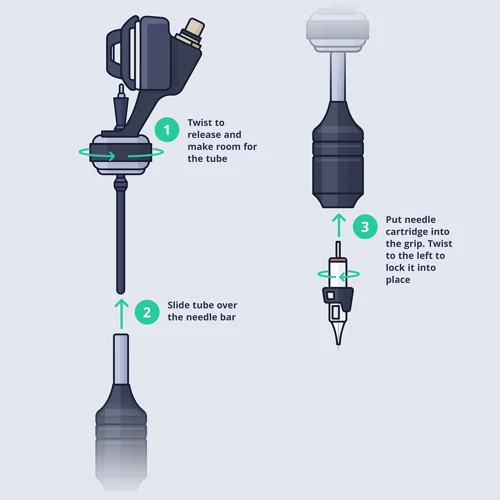
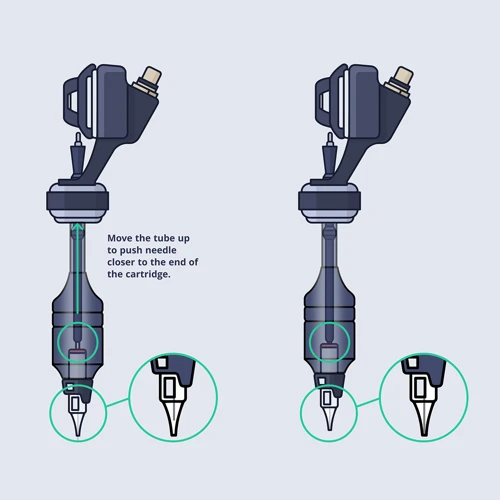
- Prepare the Machine: Attach the needle to the machine and adjust the settings according to desired depth and pressure.
- Start Tattooing: Start by lightly pressing the machine against the skin and slowly moving it in a circular motion. Make sure to keep a steady hand and keep the pressure and speed consistent throughout the tattooing process.
- Clean Up: After the tattoo is finished, apply a thin layer of tattoo balm to the area and clean the machine with a disinfectant solution.
Finishing the Tattoo
- Rinse the area with cold water: Rinse the area around the tattoo with cold water to soothe the skin and remove any excess ink. Make sure you do not rub the area too hard.
- Apply a thin layer of ointment: Apply a thin layer of a mild, fragrance-free ointment to the area. This will help to keep the area moist and promote healing.
- Cover the area with a bandage: Cover the area with a non-stick, non-absorbent bandage. This will prevent the ointment from rubbing off and keep the area clean.
- Keep the area clean: Keep the area clean by washing it twice a day with warm water and a mild, fragrance-free soap.
- Remove the bandage after a few days: After a few days, the area should be healed enough to remove the bandage. Keep the area moisturized with ointment until it is completely healed.
Aftercare for the Tattoo
Once the tattoo is finished, the area needs to be kept clean and dry. Apply a thin layer of antibacterial ointment to the tattoo, then a light layer of gauze or medical wrap. This should be done several times a day to keep the area clean and moist.
It is important to avoid direct sunlight and hot tubs for the first two weeks after the rotary tattoo machine is used. The tattoo should not be soaked in water for more than a few minutes at a time and should be dried with a clean towel.
Avoid scratching the area and touching it with unclean hands. If any redness or swelling occurs, contact a medical professional immediately.
Once the area has healed, moisturize it with a fragrance-free lotion to keep the skin healthy and the tattoo vibrant.
Frequently Asked Questions
What Type of Needle Should be Used with a Rotary Tattoo Machine?
Using the right needle is essential for working with a rotary tattoo machine. Here are some tips to help you choose the best needle for your equipment:
- Choose a needle that is compatible with your machine.
- Choose a needle with a sharp point.
- Choose a needle with a small diameter.
- Choose a needle with a short taper.
- Choose a needle with a good grip.
Make sure you take the time to select the right needle for your rotary tattoo machine. The right needle can make all the difference when it comes to the quality of your work.
What is the difference between a rotary tattoo machine and a coil tattoo machine?
Rotary Tattoo Machine:
- Uses a motor to move the needle up and down
- Has adjustable stroke length and speed
- Lightweight and compact in design
- Quieter than a coil tattoo machine
- Ideal for lining and shading
Coil Tattoo Machine:
- Uses electromagnetic coils to move the needle up and down
- Less adjustable than a rotary tattoo machine
- Heavy and large in design
- Louder than a rotary tattoo machine
- Ideal for outlining and lining
Are There Any Safety Precautions to Consider When Using a Rotary Tattoo Machine?
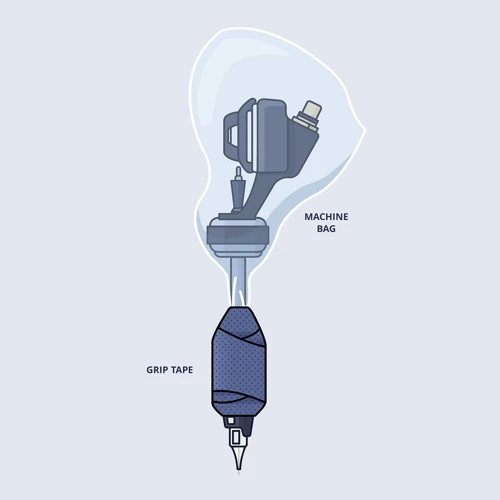
- Wear protective clothing – If you are using a rotary tattoo machine, you should always wear protective clothing such as gloves, eye protection, and a face mask.
- Keep the area clean – Whenever you are using a rotary tattoo machine, you should make sure that you keep the area clean and free of debris. This includes making sure that no dust, dirt, or other particles enter the machine.
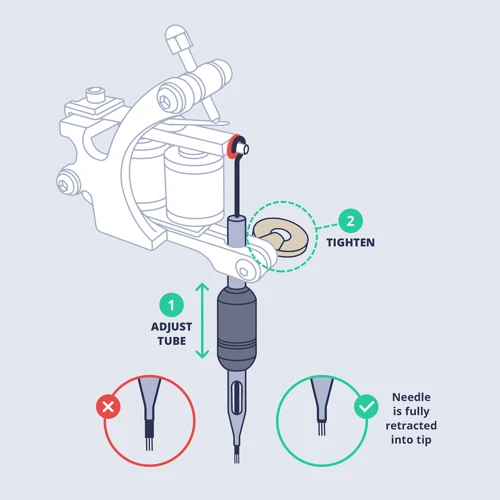
- Be aware of the needle depth – When using a rotary tattoo machine, it is important to be aware of the depth of the needle. If the needle is too deep, it can cause skin damage and scarring.
- Disinfect the machine after each use – After each use, you should disinfect the rotary tattoo machine. This helps to prevent the spread of infection and keeps the machine in good working condition.
- Choose the right needle size – When using a rotary tattoo machine, it is important to choose the right needle size for the job. Using a needle that is too small or too large can cause damage to the skin.
- Only use approved inks – When using a rotary tattoo machine, it is important to only use approved inks. Unapproved inks can contain harmful chemicals that can cause skin reactions and other health problems.
How often should the parts of a rotary tattoo machine be replaced?
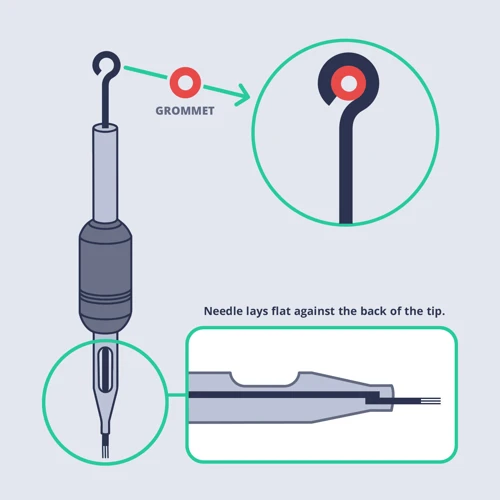
The parts of a rotary tattoo machine should be replaced regularly to ensure that the machine is in proper working condition. Tips, tubes, needles, grommets and o-rings should be replaced after each use. The motor and power cord should be replaced every two to three years. Make sure to clean these parts thoroughly after every use to maintain their quality.
How can I control the speed of the rotary tattoo machine?
The speed of a rotary tattoo machine can be adjusted manually using a knob or dial. When setting the speed, it is important to remember that the slower the speed, the less chance of a mistake. The speed should also be determined based on the type of tattoo being done. For example, shading requires a slower speed than outlining. Additionally, the needle size should be taken into account as well; larger needles require a slower speed than smaller needles. Once the desired speed is set, the machine can be used to create the desired tattoo.
Conclusion
Using a rotary tattoo machine is a great way to safely and efficiently create beautiful artwork. With the right technique and practice, anyone can become an expert in rotary tattooing. By following this guide, you should now have a better understanding of how to use a rotary tattoo machine and have the confidence to start creating beautiful tattoos.