Creating the perfect tattoo stencil for your next body art piece can often be the difference between an amazing tattoo and a disaster. If you’re looking to make your own tattoo stencil, it’s important to understand the basics of how to do it correctly. In this article, we’ll provide you with essential tips on how to create a perfect tattoo stencil for your next piece. We’ll also cover the different types of tattoo stencils, how to pick the right one, and how to ensure your stencil is ready to go before hitting the tattoo parlor. With a little practice and patience, you’ll be able to create a tattoo stencil that will give you a stunning piece of art. So let’s get started learning how to make the perfect tattoo stencil for your next piece!
Contents
What Are Tattoo Stencils?
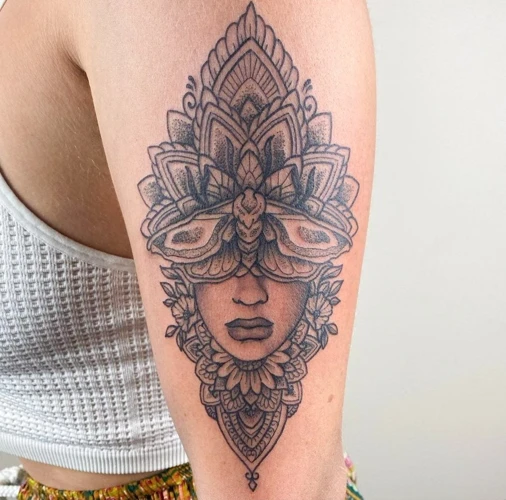
Tattoo stencils are pre-drawn designs used to transfer the desired tattoo design to the skin. These stencils, also known as ‘flash’, are usually drawn on paper, acetate or mylar and can be used to create precise and accurate line drawings of the desired tattoo. The tattoo artist then transfers the stencil onto the skin using transfer paper and a tattoo machine. This is an essential step in creating the perfect tattoo, as the stencil will ensure that the design is perfectly replicated on the skin.
How To Transfer Tattoo Stencil To Skin At Home
The most common way to transfer a tattoo stencil to the skin at home is to use transfer paper. This paper is available at most tattoo supply stores and online. To use it, simply place the stencil on the transfer paper and then place the transfer paper onto the skin. Make sure the stencil is the right size and is properly aligned before pressing it onto the skin. Once the transfer paper has been pressed onto the skin for several seconds, it can be slowly peeled off to reveal the tattoo stencil underneath. With the stencil now in place on the skin, it’s time to start inking.
What Can I Use To Stencil A Tattoo?

Creating the perfect tattoo stencil is essential for a successful tattooing experience. When it comes to tattoo stencils, there are a few tools you need to have before you begin.
The most important tool you need is a thermal copier. This is a device that copies a drawing or design onto a specially made transfer paper. It is essential for creating a tattoo stencil that will last for the duration of the tattooing process.
In addition to a thermal copier, you will also need a stencil machine. This machine is used to cut the design from the transfer paper and transfer it onto the skin. A stencil machine is an important tool for creating a precise tattoo stencil.
Finally, you will need a stencil solution. Stencil solution is used to transfer the design from the transfer paper to the skin. It is important to use a tattoo stencil solution that is specifically designed for this purpose.
These are the three main tools you need to create a perfect tattoo stencil. With the right tools, you can create a stencil that will last and ensure a successful tattooing experience.
How To Make A Tattoo Stencil With Paper
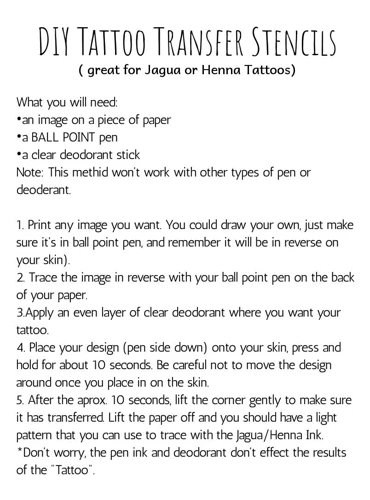
- Trace your drawing: Trace your drawing on a piece of paper using a pencil or pen. Make sure that all details are clearly visible.
- Transfer your drawing: Transfer the drawing onto a sheet of tattoo paper using a transfer pen. Make sure that all details are transferred accurately.
- Cut out your stencil: Cut out the stencil using a sharp pair of scissors. Make sure that all details are preserved.
- Apply your stencil: Apply the stencil to the skin using an adhesive such as spirit gum. Make sure that the stencil is securely in place.
- Transfer your drawing: Use a transfer pen to trace over the stencil and transfer the design onto the skin. Make sure to take your time and ensure that all details are transferred accurately.
- Remove the stencil: Once the design is transferred to the skin, remove the stencil carefully and clean up any residue.
To complete your tattoo, you will need to transfer your drawing to the skin to create the perfect piece. Follow these steps to successfully transfer your drawing to skin for tattoo: clean the skin, apply a stencil transfer solution, trace over the paper stencil, and allow the design to dry.
How To Transfer Drawing To Skin For Tattoo
Tracing a tattoo onto your skin is the final step before you start inking. To ensure a successful transfer and maintain the integrity of the design, it’s important to follow a few simple steps.
What You’ll Need:
| Item | Purpose |
|---|---|
| Tattoo design | To trace onto skin |
| Carbon paper | For transferring design |
| Razor | To remove excess carbon paper |
Steps to Transfer Tattoo Design:
- Clean the skin you plan to tattoo with a disinfectant.
- Cut a piece of carbon paper big enough to fit the tattoo design. Place the carbon paper onto the skin with the carbon side facing down.
- Position the tattoo design on top of the carbon paper and press down firmly.
- Trace the design onto the skin using a pen or marker. This will imprint the design onto the skin.
- Use a razor to remove any excess carbon paper.
- Check that the design is correctly transferred onto the skin.
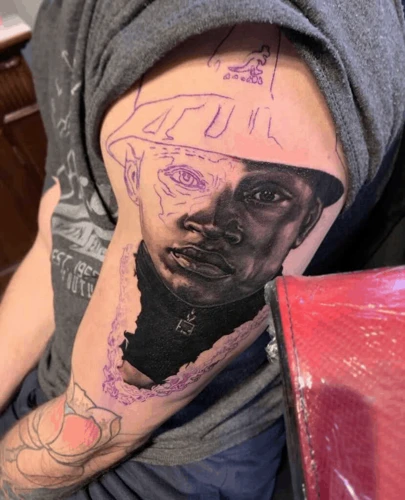
After you’ve successfully transferred your tattoo design to the skin, you’re ready to start inking. Before you begin, it’s important to double-check that your design is correctly traced onto the skin. This will ensure that the final result looks exactly how you want it to.
How to Trace Tattoo Onto Skin
- Draw the desired design on a piece of tracing paper.
- Apply a thin layer of tattoo transfer paper over the tracing paper.
- Cut around the design to make it easier to work with.
- Peel off the backing from the transfer paper and place the adhesive side onto the skin.
- Press down firmly on the transfer paper.
- Remove the transfer paper to reveal the design on the skin.
- Go over the design with a pen or marker to make it easier to see.
- Trace the design onto the skin using a tattoo needle.
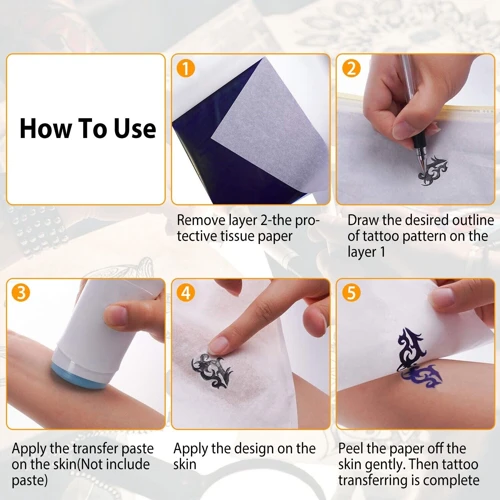
How To Transfer Tattoo Stencil To Skin At Home
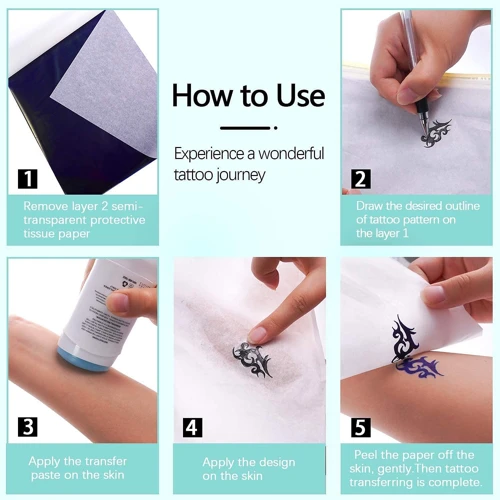
- Create the Tattoo Stencil: The first step in transferring a tattoo stencil to the skin is to create the stencil on paper. To make a tattoo stencil with paper, use tracing paper and a pencil to draw the design on the paper. Then, place tracing paper over a piece of carbon paper and trace the design onto the carbon paper.
- Transfer the Stencil to the Skin: After creating the tattoo stencil on paper, it is time to transfer it to the skin. To do this, place the carbon paper on the skin and press firmly. Then, trace over the design with a permanent marker to create an outline of the design on the skin.
- Apply Transfer Gel: After transferring the tattoo stencil to the skin, it is important to apply transfer gel. This will help to keep the stencil in place and prevent it from smudging. To apply transfer gel, use a cotton swab or a small brush to spread a thin layer of the gel over the stencil. Allow the gel to dry completely before proceeding.
- Press the Stencil: Once the transfer gel has dried, press the stencil firmly onto the skin. This will help to ensure that the stencil is securely in place and will not move during the tattooing process. When pressing the stencil onto the skin, be sure to use firm but gentle pressure.
- Remove the Stencil: After pressing the stencil onto the skin, the final step is to remove the stencil. To remove the stencil, use a damp cloth or towel to gently wipe away the transfer gel and stencil. This will ensure that the design is accurately transferred to the skin.
Once the stencil is successfully transferred to the skin, it is ready to be used for the tattooing process. It is important to always be careful and precise when transferring a tattoo stencil to the skin, as this will ensure that the tattoo looks perfect when it is finished. With these steps, it is easy to transfer a tattoo stencil to the skin at home and create perfect tattoos every time.
How To Apply Tattoo Transfer Paper To Skin
- Clean and sterilize the area where you will be transferring the stencil. Make sure the area is clean and free from any dirt, oils, and body fluids. You can use rubbing alcohol to clean the skin.
- Cut out the tattoo stencil. Using a pair of scissors, cut out the stencil that you just created. Remove any excess paper or material.
- Apply the transfer paper to the tattoo stencil. Place the tattoo stencil on top of the transfer paper and press firmly to ensure that the stencil is sticking to the paper.
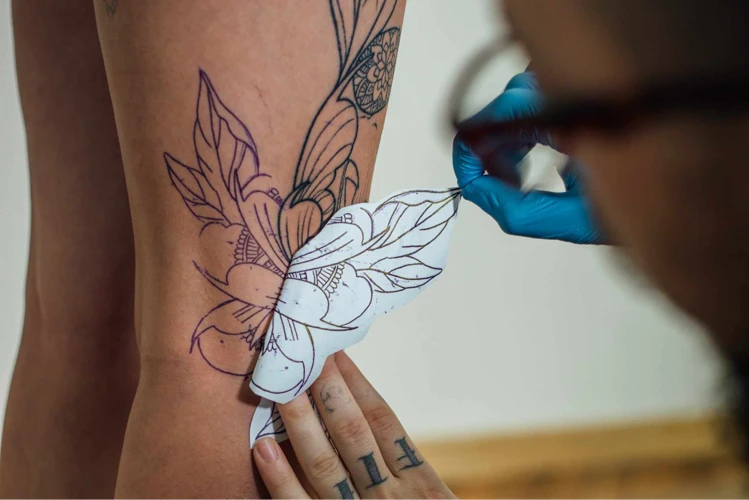
- Apply the tattoo transfer paper to the skin. Place the transfer paper with the tattoo stencil facing down on the skin where you want to place the tattoo. Rub the back of the transfer paper with a wet cloth or sponge to transfer the tattoo onto the skin.
- Remove the transfer paper. Once the tattoo has been transferred to the skin, slowly and carefully remove the transfer paper. Make sure to not pull the transfer paper off too quickly or it may cause the stencil to peel off of the skin.
- Begin the tattooing process. Now that you have a perfect tattoo stencil, you can begin the tattooing process. Make sure to use proper hygiene and safety precautions as you make your tattoo.
Using a tattoo transfer paper is an easy and effective way to make your own tattoo stencils. With the right steps, you can make sure that your tattoo stencils are perfect every time.
Tips For Perfect Tattoo Stencils
Choose the Right Material: Choose the right stencil material for your project. Stencils can be made from paper, cardstock, acetate sheets, or transparency film. Select the material that best fits the design and that can withstand the stencil application process.
Clean the Area: Make sure the skin area you are applying the stencil to is clean, dry, and free of oils or lotions. This will help ensure the stencil adheres properly to the skin.
Prepare the Stencil: Before applying the stencil, make sure the design is the right size and shape for the area of skin you are working with. You can use a ruler or stencil paper to make sure the design fits correctly.
Transfer the Stencil: There are several methods for transferring the stencil to the skin. You can use stencil transfer paper, tracing paper, or graphite paper. Once the stencil has been transferred, it is important to make sure it is positioned correctly before beginning the tattooing process.
Use the Right Stenciling Tools: You should use the right tools when stenciling. This includes a stencil brush and a pair of small scissors. A stencil brush is used to brush the stencil onto the skin and the scissors are used to cut away any excess material.
Test the Stencil: Before you begin tattooing, it is important to test the stencil. This can be done by lightly brushing the stencil onto the skin and checking to make sure it is in the correct position and that the design is correct.
Remove the Stencil: After you have tested the stencil, it is time to remove it. This can be done with a pair of tweezers. It is important to remove the stencil carefully and without damaging the skin.
Clean the Area: After the stencil has been removed, it is important to clean the area. This can be done with a damp cloth or a mild soap. This will help to ensure that the skin is free of any residue from the stencil.
By following these tips, you can create a perfect tattoo stencil for your next piece. Remember to take your time and be patient, and you will be sure to create a stencil that will last for years to come.
Frequently Asked Questions
What tools are needed to create a perfect tattoo stencil?
- Tattoo Stencil Paper: This specially-coated paper is designed to hold up to the abrasive actions of tattooing and is used to transfer the tattoo design onto the skin.
- Inkjet or Laser Printer: This is used to print the stencil image onto the tattoo stencil paper.
- Ruler: This is used to measure the size of the stencil.
- X-Acto Knife: This is used to cut out the stencil.
- Tattoo Transfer Cream: This is used to apply the stencil onto the skin.
- Tattoo Transfer Gel: This is used to hold the stencil in place on the skin.
- Tattoo Gun: This is used to apply the tattoo pigment onto the skin.
How can I ensure my tattoo stencil is accurate and detailed?
- Choose the right type of paper for your stencil. There are various types of paper available specifically for stenciling, such as wax paper, carbon paper, and thermal paper. Choose the right paper for your project to ensure the stencil is accurate and detailed.
- Draw the image lightly. When you are drawing the image onto the paper, use a light pencil or pen so that you can easily erase any mistakes. This will help you create an accurate and detailed stencil.
- Use a ruler. Using a ruler will help you draw a straight line and ensure the stencil is accurate. If the stencil is not straight, the final tattoo design may look distorted.
- Make sure the lines are thin. The lines of the stencil should be thin and precise in order to ensure the tattoo is accurate and detailed. If the lines are too thick, the tattoo design may not come out as clear as you want it to.
- Take your time. Creating a perfect stencil takes time and patience. Don’t rush the process and take your time to make sure the stencil is accurate and detailed.
What Techniques Should I Use To Make Sure My Stencil is Durable?
- Use Thick Paper – If you are using a paper stencil, make sure it is thick enough to withstand multiple uses. A thicker paper will help prevent the stencil from ripping or tearing when transferring the design to the skin.
- Prepare the Skin – Before applying the stencil to the skin, make sure to clean the area and exfoliate the skin. This will help remove any dirt, oil, or other debris that could interfere with the stencil adhesion.
- Use Transfer Paper – Transfer paper is an excellent tool to help create a durable stencil. It allows you to transfer a design from a printer onto the skin without having to redraw the design. Make sure to use a fresh sheet of transfer paper for each stencil.
- Set the Stencil – Once you have transferred the design onto the skin, set the stencil using a spray adhesive or a stencil setting solution. This will help keep the stencil in place and prevent it from smudging or fading away.
- Clean Up the Edges – After the stencil has been set, carefully go over the edges with a sharp razor blade or a surgical blade to make sure all of the edges are clean and crisp. This will help ensure that the stencil lines are precise and accurate.
How can I transfer my stencil onto the skin of the tattoo recipient?
- Using a Transfer Paper: Transfer paper is a wax-like paper with a adhesive coating on one side. Place the paper with the adhesive side down onto the stencil and press firmly. Then, take the paper and place it on the skin of the recipient and press firmly. Use a wet cloth to wet the paper and massage it gently, so that the stencil starts to transfer onto the skin.
- Using Tattoo Transfer Cream: Tattoo transfer cream is a special type of cream that is used to transfer the stencil on to the skin. Apply a thin layer of the cream to the back of the stencil and press it into the skin. This will help the stencil to transfer onto the skin.
- Using Thermal Copier: Thermal copiers are special machines that are used to transfer the stencil onto the skin. Place the stencil on the machine and press the start button. The machine will then transfer the stencil onto a thermal paper. Take the thermal paper and press it onto the skin. This will help the stencil to transfer onto the skin.
How can I make sure my stencil will last during the tattooing process?
To ensure that your stencil will last during the tattooing process, it is important to use the right paper and transfer method. Use transfer paper specifically designed for this purpose and transfer the stencil to the skin using a thermal copier machine. Make sure to use a clean, sterile device and apply a light layer of stencil primer to the skin first. Finally, apply a thin layer of petroleum jelly to the stencil before tattooing.
Conclusion
Tattoo stencils are an important part of the tattooing process. They provide the artist with a template for the design, making it easier to ensure the tattoo looks great. With the right supplies and knowledge, anyone can create perfect tattoo stencils for their next piece.