Are you interested in creating your own customized tattoo design? Drawing tattoo designs can be a fun and creative way to express yourself. This easy step-by-step guide will show you how to draw tattoo designs that are unique and perfect for you. With helpful tips and techniques, you’ll be able to create a design that is truly your own.
Contents
Step-by-Step Guide to Drawing Tattoo Designs
1. Get Your Supplies Ready: Gather all the necessary supplies you need to start drawing tattoo designs. You will need sketching paper, pencils, erasers, markers, and drawing pens.
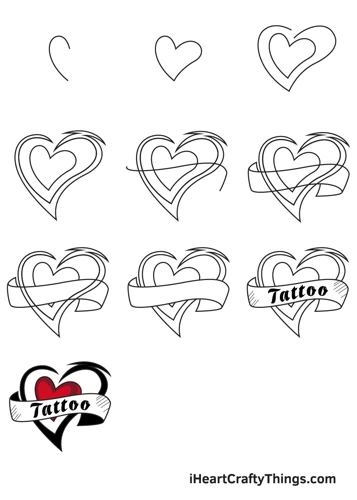
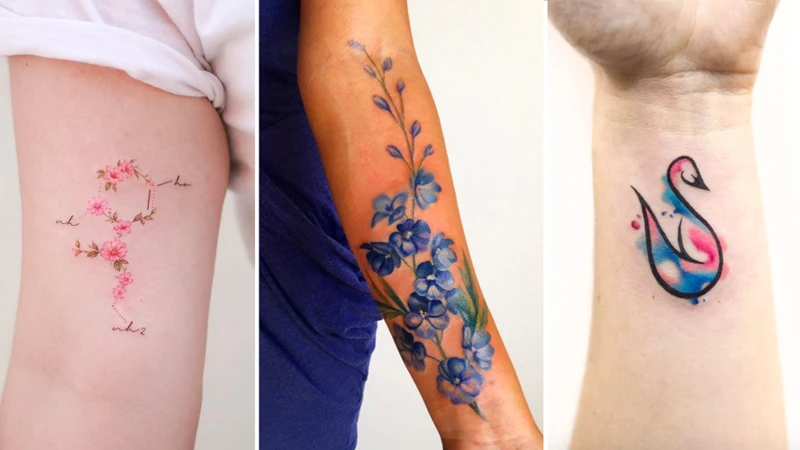
2. Start With Thumbnails: Begin by sketching out rough thumbnails of your tattoo ideas. This will help you get an idea of what your design will look like. Keep it simple and focus on the main elements of the design.
3. Outline Your Design: Once you have a few thumbnails to work with, it’s time to draw the outline of your tattoo design. Use your pencil to lightly draw the outline of your design. This will help you get a better idea of the size and shape of your tattoo.
4. Add Details: Now it’s time to start adding the details to your tattoo design. Start by adding the outlines of the elements of the tattoo, such as flowers, hearts, animals, etc. Once you have these elements outlined, you can start to add in the shading and color.
5. Finalize Your Design: Once you are happy with your tattoo design, it’s time to finalize it. Use your markers and pens to add in the final touches, such as shading and color. Once you are finished, you will have a unique tattoo design that you can proudly show off!
6. Transfer to Skin: The last step is to transfer your tattoo design onto the skin. Use a transfer paper to trace the design onto the skin. This will help you get a better idea of how the design will look on the skin.
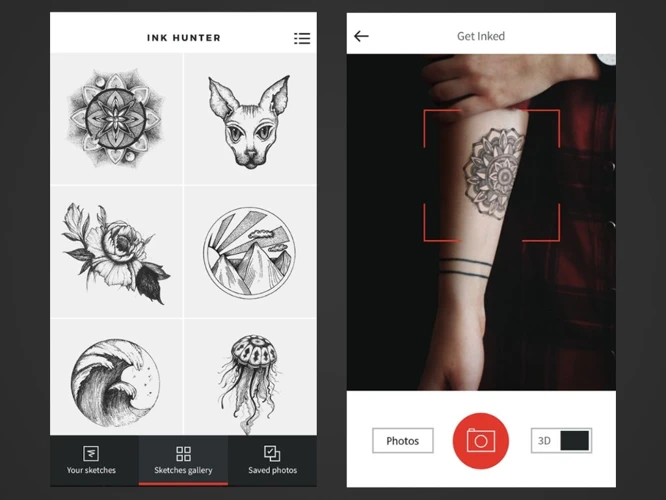
7. Get Inked: Finally, it’s time to get your design inked! Find an experienced tattoo artist who can bring your tattoo design to life. Make sure you find someone who you trust and who you feel comfortable with. With the help of your tattoo artist, you can create a beautiful and unique tattoo design that you will love for years to come.
By following these steps, you can easily create your own custom tattoo designs. With a little practice and patience, you can learn how to draw tattoos designs on paper and transfer them to the skin.
Planning Your Design
- Brainstorm ideas for your tattoo design. Consider the size, shape, and placement of the design and what it will look like on your body.
- Analyze the cultural and religious symbolism behind the design. Consider the connotations and associations that the design has.
- Think of the tattoo design in terms of composition. Visualize how the elements of the design will interact with each other.
- Research for inspiration. Look for examples of similar designs and draw inspiration from them.
- Develop a sketch of the design. It doesn’t need to be perfect, but it should convey the idea behind the design.
- Make sure that all the details of the design are correct, especially if you are using symbols or words from another language.
- Ensure that the design adheres to the cultural, religious, and aesthetic values of the tattoo artist.
Planning your design is an essential step in learning how to draw tattoo designs. It’s important to consider the size, shape, and placement of the design, as well as the cultural and religious symbolism behind it. Take inspiration from existing designs, and develop a sketch of your own. Make sure all the details of the design are accurate and that the design is culturally appropriate. With careful planning, you can create a unique and meaningful tattoo design that you can be proud of.
Sketching Your Design on Paper

- Sketching your tattoo design on paper helps you to visualize the final look and size of the tattoo.
- It is important to draw the design on paper first as this allows you to make changes and adjustments to the design before committing to it.
- Using a pencil allows you to erase and redraw elements to make sure that your design is perfect.
- Ensure that you use a ruler to help draw straight lines and use graph paper for precise measurements.
- Once you have sketched out your design you can make copies onto tracing paper so that you can transfer the design onto the area of skin that you wish to tattoo.
- Tracing paper can also be used to draw the design on the skin using a pen and then the outline transferred using a tattoo transfer paper.
You can now move onto the next step in how to draw a tattoo on yourself – inking your design.
Refining Your Design

- Choose an overall theme: Decide on a main focus for your tattoo, such as a character, an animal, or a flower, and design your tattoo around this idea.
- Add details: As you refine your tattoo design, consider adding small details such as stars, swirls, and other symbolic elements.
- Consider size: When drawing a tattoo design, think about how it will look when it is inked and choose a size that is right for the area of the body it will be inked on.
- Keep it simple: To create an effective tattoo, it’s important to keep your design simple and avoid overcrowding the tattoo with too many elements.
- Choose meaningful symbols: Tattoos are often used to represent important memories, feelings, or beliefs. Consider adding meaningful symbols that have special significance to you.
Drawing Your Design on Your Skin

Once you have settled on a tattoo design, it’s time to draw it on your skin.
- Using a soft-lead pencil, draw the outline of your design onto the chosen area of your skin.
- Carefully trace over the pencil outline with a permanent marker.
- Ensure the lines are even and smooth, and that the design is symmetrical.
- For a longer-lasting tattoo, draw in the color with a thin brush and non-toxic paint.
- Finally, spray the area with a fixative to ensure your cool tattoo lasts.
Creating a unique and meaningful tattoo is often a long process, but if you follow these steps, you will be able to create a cool tattoo that you can be proud of.
Tips for Creating Your Perfect Tattoo
- Research and Get Inspiration: Before you start sketching, spend time researching different tattoo designs and getting inspiration from different sources. Look for images that correspond to the type of tattoo design you want and pay attention to the details of the design. You can even try to replicate the design in your own sketch.
- Choose a Meaningful Design: When selecting your tattoo design, make sure it has significant meaning to you and is something you want to represent. Choose a design that reflects your personality, beliefs, and interests. Also, consider the placement of the design on your body and make sure it is not too visible.
- Find an Experienced Artist: It is important to find an experienced and reliable tattoo artist who will help you create the perfect tattoo design. Check out an artist’s portfolio and ask for recommendations from friends and family. Make sure your artist is licensed and certified by the appropriate health and safety organizations.
- Consider the Size: Tattoos come in all shapes and sizes, so decide on the size of your tattoo before you start sketching. Consider the size of your body and the placement of the tattoo to ensure that it fits properly. If you are a first-time tattoo artist, it is best to start off with a small design.
- Think About Color: When designing a tattoo, you should consider the color palette that you want to use. Some tattoos look better in black and grey, while others look great with bright, vibrant colors. Consider the colors that you are drawn to and make sure they complement each other.
- Be Patient: Creating the perfect tattoo design takes time and patience. Take your time and don’t rush the process. When you are happy with your design, you can then take it to your tattoo artist to have it inked.
Choosing the Right Location
- Consider Your Skin Tone: Your skin tone will affect the way your tattoo looks, so it’s important to choose a location that won’t be too harsh or too subtle. Darker skin tones look best with bolder, blacker tattoos, while lighter skin tones can handle more intricate designs.
- Be Aware of Movements: Tattoos on areas that move a lot, such as the ankle, wrist, or shoulder, will tend to fade or blur more quickly than tattoos in less active areas. If you plan to get a tattoo in a highly mobile area, you may want to opt for a smaller design.
- Think About Visibility: If you plan to show off your tattoo, you’ll want to choose a location that will be easy to display. On the other hand, if you plan to keep your tattoo private, you may want to opt for a more discreet spot.
- Understand Aftercare: Different locations require different levels of aftercare. For example, tattoos on the arms, legs, or abdomen will require more frequent touch-ups than those on the back or chest.
When it comes to how to draw a tattoo easy, choosing the right placement for your design is key. Be sure to consider your skin tone, be aware of movements, think about visibility, and understand aftercare when picking the perfect spot for your tattoo.
Choosing the Right Colors
Choosing the right colors for your tattoo design is important, as it can drastically change the outcome of the design. Before you begin drawing your design, it’s important to understand the basics of how color works. Here are some tips to help you choose the right colors for your tattoo design:
- Choose High Contrast Colors: Using colors with a high level of contrast can help make your tattoo design more visible and attractive. For example, a black and white design will stand out more than a design with similar shades of color.
- Think About Skin Tone: It’s important to consider skin tone when choosing colors for your tattoo design. If you have a lighter skin tone, you may want to choose lighter colors, while if you have a darker skin tone, you may want to choose darker colors.
- Understand Color Meanings: Different colors can have different meanings. For example, red can represent passion, orange can represent energy, and blue can represent calmness. Understanding the meaning of colors can help you choose the right colors for your design.
Once you understand the basics of choosing colors for your tattoo design, you can begin to experiment with different colors and combinations to create a unique and attractive design.
Choosing the Right Size

Size Matters: When it comes to making sure your tattoo looks perfect, size is key. Make sure you’ve got the proportions of your design just right and that it will fit the size of the area you want to get it inked.
Proportion: Consider the size of the design in relation to the size of the area. For example, if you’re wanting a bigger tattoo on your back, it might be best to choose a design that’s wider than it is tall.
Consider the Placement: The placement of your tattoo is also important when it comes to choosing the right size. Think about how the size of your design will look in the area you want it inked.
Be Practical: If you’re getting a tattoo on a more delicate area like the wrist or ankle, you might want to opt for a smaller design. Larger tattoos in these areas can cause discomfort and be difficult to cover for formal occasions.
Talk to Your Artist: Your tattoo artist is the best person to talk to about the sizing of your design. They will be able to give you advice on what will work in the area that you’re getting the tattoo inked.
Things to Consider:
- Proportion of the design
- Placement of the tattoo
- Area of the body
- Advice from your tattoo artist
Choosing the Right Artist

Research: Before committing to a tattoo artist, research their portfolio and reviews to make sure they are experienced in the style you’re looking for. Ask around to find out who is the best in your area.
Consultation: After you have chosen an artist, book a consultation appointment to discuss your ideas and get to know each other. Ask questions about their portfolio and experience, and discuss any concerns you have.
References: Ask the artist for references from previous clients. This will give you an idea of their work, as well as how they interact with clients.
Safety: Make sure the artist and their studio follow safety protocols. This includes using sterile equipment, wearing gloves, and using single-use needles.
Cost: Ask the artist for an estimate on the cost of the tattoo. Some may charge by the hour, while others may charge per piece. Look into any discounts or specials they offer.
Aftercare: Ask the artist for details on post-tattoo care. This will include instructions on how to keep the area clean and how to prevent infection.
Conclusion
Drawing a tattoo design is no easy feat. You’ll need to have patience, practice, and have a basic understanding of art fundamentals. With some time and effort, you can draw your own tattoo designs and create a unique and meaningful piece of art.
- Do research and brainstorm ideas
- Understand the basics of art
- Draw out your design with pencil and paper
- Transfer your design onto skin with a tracing paper
- Outline your design with a marker or pen
- Color and shade in your design with tattoo ink
By following these steps, you can create your own tattoo design that you’ll be proud of and cherish for years to come.
References
- Canvas Tattoo: How to Draw Tattoo Designs: An Easy Step-by-Step Guide to Creating Your Perfect Tattoo
- Tattoo Easily: How to Draw Tattoos Designs on Paper
- Tattoodo: Learn How to Draw Tattoo Designs
- Tattoo Wike: How to Draw a Tattoo on Yourself
- Tattoo Me Now: Tattoos – How to Draw
- Ink Vivo: How to Draw a Cool Tattoo
- Tattoo Tutorials: How to Draw Tattoo Designs for Beginners
- Tattoo Johnny: How to Draw a Tattoo Easy
Drawing a Tattoo on Paper
Step 1: Gather your materials. You’ll need a pencil, paper, and a ruler or straight edge for drawing precise lines.
Step 2: Draw a sketch. Start by drawing a simple outline of the design on the paper using the pencil and ruler.
Step 3: Refine the details. Add more details to the sketch, adjusting the lines and curves to create the desired shape.
Step 4: Outline the design. Use the ruler to draw a precise line for the outline.
Step 5: Add color. If desired, you can use colored pencils or markers to fill in the design.
Step 6: Erase any unnecessary lines. Once you’ve finished the design, erase any pencil lines that are unnecessary.
Step 7: Transfer to skin. To transfer the design to skin, use a transfer paper or stencil.
Frequently Asked Questions
What Kind of Drawing Materials Do I Need to Make a Tattoo Design?
For creating a tattoo design, you will need a few basic materials such as paper, pencils, erasers, pens, markers, and an ink pad. You can also use a computer with a drawing or graphics program to create your design. You will also need a variety of colored markers, pencils, and inks to create your design. Finally, you will need a tattoo machine and needles for inking the design.
How do I transfer my tattoo design onto the skin?
To transfer your tattoo design onto the skin, you need to print out your design onto transfer paper. The paper must be specifically designed for transferring tattoos, as regular printer paper will not work. Once the design is printed, place the paper onto the skin, and press down firmly with a damp cloth or sponge. Leave the paper in place for a few minutes, and then carefully peel it off. The tattoo design should now be transferred onto the skin.
What are the Best Techniques for Shading a Tattoo Design?
1. Color Blending: Color blending is a great way to add dimension to a tattoo design. It involves the use of lighter and darker colors to create a soft, blended look. This technique can be used to create a subtle, natural-looking effect.
2. Gradients: Gradients are an effective way to add depth and texture to a tattoo design. The use of multiple colors in gradual transitions can create a realistic, 3D effect.
3. Smudging: Smudging is a technique that involves using a soft brush to blend colors together. This technique is often used to create a soft, dreamy look.
4. Cross-Hatching: Cross-hatching is a technique that involves using a combination of thin, overlapping lines to create a shading effect. This technique can be used to create a bold, textured look.
5. Dotting: Dotting is a technique that involves using small dots to create a shading effect. This technique is often used to create a subtle, natural look.
What Safety Precautions Should I Take When Drawing Tattoo Designs?
Wash your hands: Always wash your hands with soap and water before and after drawing tattoo designs.
Wear a mask: Wear a face mask while drawing designs to protect yourself and others from breathing in dust particles.
Use gloves: Wear disposable gloves when handling the drawing supplies to avoid direct skin contact with potential allergens.
Disinfect: Disinfect the drawing supplies before and after use with an alcohol-based cleaner.
Observe cleanliness: Keep the work area clean and free of clutter to avoid potential contamination of the design.
How can I make sure my design is unique?
- Research: Look around for inspiration and get familiar with already existing tattoo designs to get an idea of what’s already out there.
- Brainstorm: Brainstorm ideas and sketch out possible designs to help you find an original idea.
- Develop: Take your ideas and develop them into a unique tattoo design.
- Refine: Refine your design for the best possible outcome.
- Get Feedback: Get feedback from others and take their suggestions into consideration.
Conclusion
Creating your own tattoo design is an exciting and creative process. With the right tools, patience, and practice, you can easily draw a beautiful tattoo design that is perfect for you. Take your time to experiment with different shapes, sizes, and colors to find the ideal design, and enjoy the process of creating a unique, one-of-a-kind piece of artwork that you can always be proud of.
References