If you’re looking to learn how to shade tattoos, this article provides a step-by-step guide to perfect shading. From choosing the right supplies to understanding the essentials of shading, this guide will help you master the art of tattoo shading. You’ll learn about the different types of shading, the different supplies you’ll need, and the techniques you can use to create beautiful, realistic shading. With practice and patience, you’ll soon be able to create stunning shaded tattoos.
Contents
Preparing to Shade a Tattoo
Choosing the Right Equipment
Making sure you have the right equipment is essential to create a perfect tattoo. You will need a high quality tattoo machine, a power supply, clip cord, and needles. The right needles are essential for shading and will depend on the type of shading you are doing. For example, if you are doing a light shading, then you would need a small round shader. If you are doing a bolder shading, then you would need a larger round shader.
Assembling and Setting Up Your Tattoo Machine
Once you have the right equipment, you can start setting up your tattoo machine. Make sure to adjust the voltage, speed, and needle depth of your machine according to the type of shading you are doing. Then, attach the clip cord and power supply to the machine.
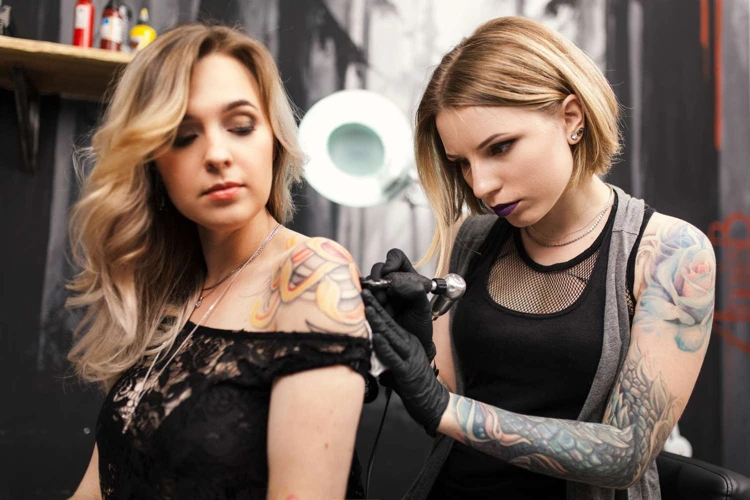
Preparing the Skin
Before you start shading, you need to prepare the skin. This includes shaving the area, cleaning the area with an antiseptic solution, and then applying a thin layer of petroleum jelly to the area. This will help reduce friction and make the shading process smoother. Once the skin is prepared, you are ready to start shading.
Techniques for Shading a Tattoo
Outlining the Tattoo
The first step in shading a tattoo is to outline the design. This will help you create a crisp, clear design that is easy to color and shade. To do this, use a fine-tipped needle to draw a clean line around the design, making sure to stay within the lines.
Making Hatching Lines
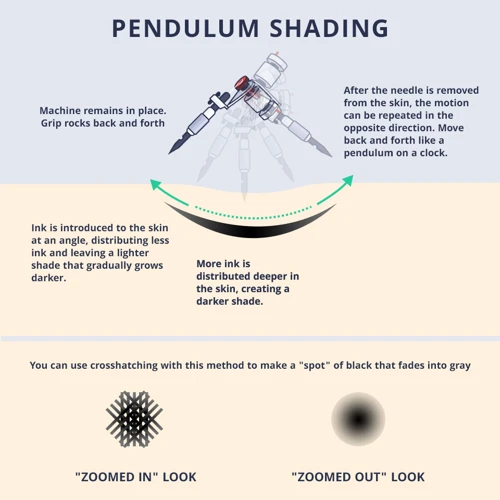
Hatching is a technique that involves creating thin lines that are parallel or perpendicular to each other. This technique can be used to create shadows, add texture, and create shading on a tattoo. To create hatching lines, use a thin needle and a steady hand to make thin lines in the direction you want.
Creating Shading with Stippling
Stippling is a technique that is great for creating soft shading and texture. To do this, use a thin needle and move it in a circular motion over the area you want to shade. This will create dots that blend together to create a soft, shaded look.
Creating Soft Shading
Soft shading is a great way to add depth and texture to a tattoo. To do this, use a thin needle and gently shade in the area. Make sure to move the needle in circles in order to create a soft, blended look.
Creating Gradients
Gradients are a great way to add dimension to a tattoo. To create a gradient, use a thin needle and start shading in one area. Gradually increase the intensity of shading as you move away from the original point.
Creating Shadows
Shadows are a great way to add depth and realism to a tattoo. To create shadows, use a thin needle and shade in the area. Make sure to move the needle in circles in order to create a soft, blended look.
Shading tattoos can be a difficult task, but with practice and dedication, anyone can learn how to shade tattoos for beginners. By following these steps, you can create beautiful, shaded tattoos that will last a lifetime.
Aftercare and Maintenance
Aftercare is one of the most important parts of getting a tattoo. Proper aftercare helps ensure a successful outcome and prevents infection and other complications. Here are some steps for proper aftercare and maintenance of your tattoo:
- Keep the tattoo clean and dry. Wash the area gently with mild soap and lukewarm water, then pat dry with a clean cloth. Do this twice a day for the first week, then once a day after that.
- Apply a thin layer of unscented lotion to the tattooed area twice a day, for the first two weeks after getting your tattoo. Avoid lotions with additives like alcohol, which can dry out the tattoo.
- Avoid direct sunlight and tanning beds for the first two weeks. The ultraviolet light in sunlight can damage the colors of your tattoo, and may delay healing.
- Avoid swimming pools and hot tubs for at least two weeks. Chlorinated water can irritate the fresh tattoo.
- Avoid using a tattoo gun for shading until the tattoo is completely healed. This will help prevent infection and ensure that your tattoo looks its best.
Maintenance is also important for keeping your tattoo looking its best. Here are some tips for maintaining a healthy tattoo:
- Keep the tattoo out of direct sunlight, and always use a sunscreen with at least SPF 30 when exposing your tattoo to the sun.
- Avoid using abrasive products, such as loofahs, when washing the tattooed area.
- Moisturize the area with unscented lotion regularly, to keep the colors bright and prevent the skin from drying out.
- If you notice any signs of infection, such as redness, swelling, or unusual discharge, contact your doctor or tattoo artist right away.
Following these steps will help ensure that your tattoo looks its best for years to come.
Frequently Asked Questions
What Materials or Tools Do I Need for Shading a Tattoo?
Shading a tattoo requires the use of sterile needles and inks, practice skin, a tattoo machine, and a power supply. For the needles and inks, use professional-grade, non-toxic and sterile materials designed specifically for tattooing. Practice skin helps you perfect your technique before applying it to actual skin. Tattoo machines are used to create the desired effect with the needles. Lastly, the power supply provides the current to power the machine.
How do I avoid creating harsh lines when shading a tattoo?
When shading a tattoo, use a combination of both hard and soft edges to create a smooth, realistic look. To achieve this, start with a thin line of ink and slowly build it up, blending the hard edge with a softer one. To avoid harsh lines, use a combination of stippling and feathering techniques. Stippling involves tapping the needle on the skin to create a dot-like pattern, while feathering involves gently pulling the needle across the skin to create a curved line. Both techniques can be used to create smooth, blended edges as opposed to harsh, straight lines.
How do I Know When a Tattoo is Completely Shaded?
When shading a tattoo, it is important to ensure that the design is completely shaded. This can be done by running your hand over the area and feeling for any uncovered patches or gaps in the shading. It is also important to assess the tattoo in natural lighting to ensure that the shading looks even and consistent. A magnifying glass can be used to check for any imperfections in the shading. If any discrepancies are found, additional shading can be added until the area is completely and evenly shaded.
What techniques should I use to create a smooth shaded tattoo?
- Outlining: Outlining is the first step in creating a shaded tattoo. Outlining helps to define the shape and structure of the tattoo, and gives a foundation for shading. To ensure a smooth outline, use a steady hand and use a thin line when outlining.
- Hatching and Cross-hatching: Hatching and cross-hatching are two of the most common techniques used to create a smooth shaded tattoo. Hatching is when you draw several short, parallel lines next to each other to create a smooth shade. Cross-hatching is when you draw two sets of parallel lines, one set perpendicular to the other, and then fill in the gaps. This creates a more solid shade.
- Stippling: Stippling is the process of creating a smooth shade by using small, circular dots. This is a popular technique used in tattoo shading, and can be used to create a variety of effects. The size and spacing of the dots can be adjusted to create a smooth, consistent shade.
- Smudging: Smudging is a common technique used to create a smooth, blended shade. This technique involves smudging the lines and shading with a cloth or a brush to create a softer, more even texture.
- Blending: Blending is a technique used to create a smooth, seamless transition between shades. This can be done by using a brush or a cloth to blend two different shades together. This technique is especially useful for creating a smooth, realistic tattoo.
How often should I clean my tools when shading a tattoo?
It is essential to regularly clean your tools during the shading process:
- Before, during and after each session, all tools should be wiped with isopropyl alcohol.
- The needles should be changed for each individual.
- Tubes and grips should be replaced when they show signs of wear and tear.
- The machine should be inspected and cleaned with isopropyl alcohol after every session.
- All tools should be sterilized in an autoclave after each session.
It is important to keep your tools clean and sanitized in order to maintain the highest levels of hygiene and safety during the tattooing process.
Conclusion
Shading tattoos is an important skill to master in order to create a professional and attractive looking design. This guide has provided you with the necessary steps to perfect your shading techniques and create beautiful tattoos. With practice, patience, and dedication, you can become an expert tattoo artist in no time.