Are you interested in giving yourself a tattoo, but don’t know where to start? Learning how to use a tattoo stencil is a great first step in the process. A tattoo stencil is a template used to outline the design of a tattoo. In this article, we will walk you through the steps of how to use a tattoo stencil and provide some helpful tips and advice. With this step-by-step guide, you’ll be well on your way to creating beautiful, professional-looking tattoos.
Contents
Preparing for Stencil Application

Preparing the Skin
It is important to make sure the skin is clean and dry before applying a tattoo stencil. Use an antiseptic to clean the area and make sure you wait for the skin to dry completely before applying the stencil. Ensure all traces of lotion, oils, and sweat are removed from the skin.
Preparing the Stencil
The stencil should be cleaned with a damp cloth before application. Be sure to remove any dirt or debris that may hinder the accuracy of the stencil. Make sure the stencil is free of any creases or wrinkles.
When you have followed these steps, you are now ready to learn how to use a stencil tattoo.
Applying the Stencil
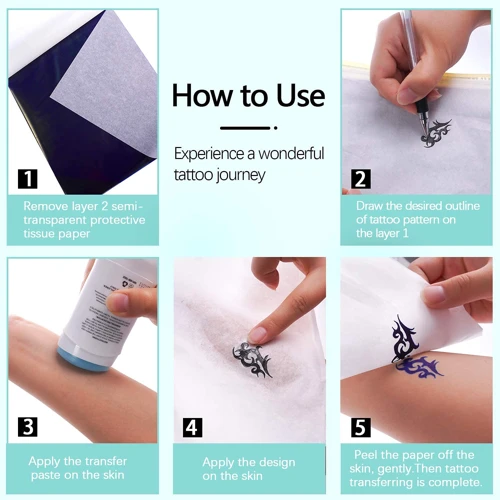
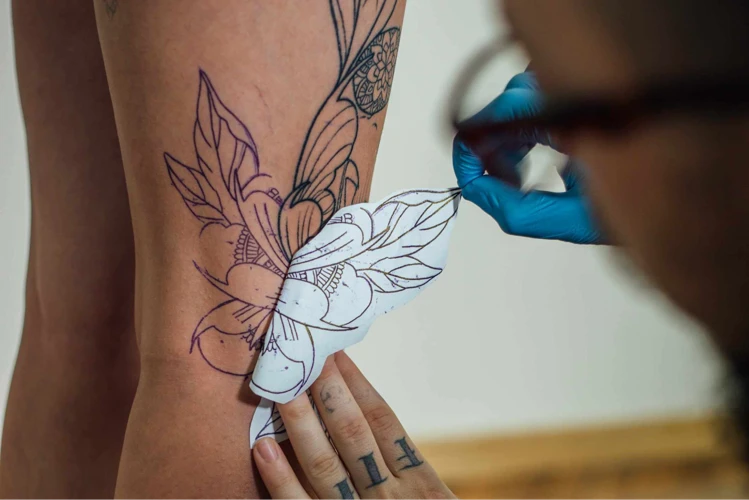
Step 1: Place the stencil on the part of the body you wish to tattoo. Make sure the stencil is firmly pressed against the skin and won’t move while you’re transferring the design.
Step 2: Trace the stencil onto the skin with a marker or pen that won’t irritate the skin. Make sure to trace the stencil exactly as it appears, paying close attention to the details.
Step 3: Carefully remove the stencil from the skin. Depending on how long does it take to make a tattoo stencil, the design should be clearly visible on the skin.
Step 4: Allow the transfer ink to dry completely before proceeding with the tattoo. This will ensure that the design is clearly visible and can be easily followed.
Transferring the Stencil to the Skin
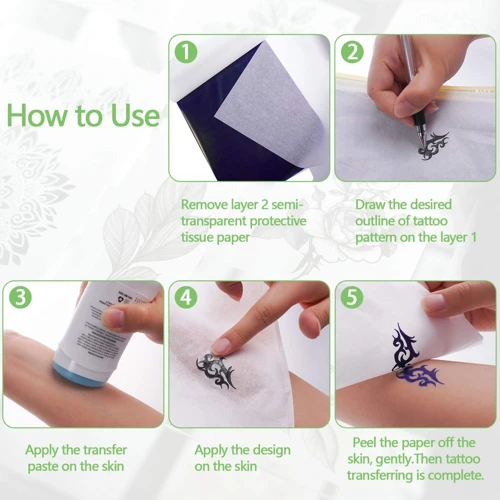
Once you have the design drawn on the stencil paper, the next step is to transfer it to the skin. To do this, you will need a transfer solution or transfer paper. Transfer solutions are usually a combination of liquid soap, glycerin, and water. This will help keep the stencil from smearing or running when applied to the skin.
Once you have the transfer solution, apply a generous amount to the back of the stencil paper. Then, place the paper on the desired area of skin. Make sure to press down firmly on the stencil so it sticks. It is important to use a firm pressure to ensure a good transfer.
Once the stencil is firmly in place, use a damp cloth to press over the stencil. Make sure to press firmly, but not too hard so you don’t damage the skin. This will help the stencil transfer its design to the skin. After a few minutes, carefully remove the stencil paper.
The stencil should now be transferred to the skin. You can now begin to work on the tattoo.
Tattooing with the Stencil
- Clean the skin – Before tattooing, make sure the skin is clean. Disinfect the skin with alcohol and a cotton swab.
- Position the stencil – Place the stencil where desired on the skin. Lightly rub the stencil so it adheres to the skin.
- Trace the stencil – Use a marker to trace the outline of the stencil onto the skin. This will help you stay within the lines when tattooing.
- Prepare the tattoo machine – Make sure the needles are sterile and the ink is fresh. Set the power level of the machine according to the size and depth of the tattoo.
- Start tattooing – Place the needles of the tattoo machine at the start of the stencil. Carefully trace the lines of the stencil while operating the machine. Move the machine at a steady speed and be sure not to go outside the lines.
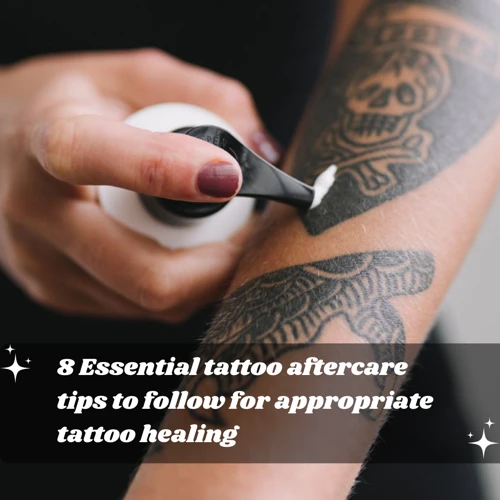
- Finish the tattoo – Once the tattoo is finished, use a damp cloth to clean the skin. Apply a thin layer of antiseptic ointment and cover with a bandage.
Aftercare
| Action | Description |
|---|---|
| Clean | Gently wash the stenciled area with mild soap and warm water. |
| Moisturize | Apply a thin layer of an unscented moisturizer to the tattoo at least twice a day. |
| Protect | Avoid exposing the tattoo to direct sunlight for at least six weeks. |
| See a Doctor | If you experience any redness, swelling, or other signs of infection, consult your doctor immediately. |
Common Problems with Stencil Tattoos
| Problem | Solution |
|---|---|
| Tattoo Fading | Fading tattoos are usually caused by improper stencil placement. To prevent this from happening, check the placement of the stencil before beginning the tattoo. |
| Ink Smearing | Ink smearing may occur when the stencil is not properly adhered to the skin. To avoid this, make sure the stencil is firmly pressed against the skin and use a stencil transfer solution to ensure good adhesion. |
| Ink Blurring | Ink blurring can be caused by unsteady hand movements. To help prevent this, use a tattoo machine with adjustable speed settings to slow down the needle movement. |
| Ink Splattering | Ink splattering is usually caused by too much ink being used. To avoid this problem, use a lighter pressure when applying the ink and use a paper towel to absorb any excess ink. |
| Uneven Coloration | Uneven coloration is often caused by not using enough ink. To prevent this, use a thicker stencil line and apply more ink than you think is necessary. |
Frequently Asked Questions
What Type of Paper Should I Use for a Tattoo Stencil?
When creating a stencil for a tattoo, it is important to use a paper that won’t tear, smudge or bleed. The best option is to use a stencil paper specifically designed for tattoo stencils. This type of paper is thicker than regular printer paper and is treated with a special formula to prevent bleeding. Using a stencil paper will ensure that your design is transferred accurately onto the skin.
How do I Clean a Tattoo Stencil after Use?
Cleaning a tattoo stencil after use is an essential part of the tattoo process. Here are the steps you should take to properly clean a tattoo stencil after use:
- Remove any excess stencil material from the skin with a paper towel or damp cloth.
- Thoroughly wash the stencil under warm, soapy water.
- Gently scrub off any remaining residue with a soft brush.
- Rinse the stencil off with warm water.
- Allow the stencil to air dry on a clean cloth or paper towel.
- Store the stencil in a clean and dry place.
It is important to carefully clean the stencil after each use to ensure that it is free of any bacteria and contaminants. This will help to prevent any skin infections or other complications. Additionally, proper cleaning will help to extend the life of the stencil, allowing you to use it for longer.
What is the Best Way to Transfer the Tattoo Stencil onto the Skin?
Tracing Paper: Tracing paper is the most popular method of transferring the stencil to the skin. Trace the stencil onto the paper, then flip the paper upside down and place it on the skin. Trace the stencil onto the skin using a pen, marker, or tracing wheel.
Carbon Paper: Carbon paper is similar to tracing paper, but it transfers the image more clearly. Place the carbon paper between the stencil and the skin, then trace the stencil onto the skin.
Freehand: For experienced tattoo artists, freehanding the stencil onto the skin is an option. If you’re a beginner, it’s best to use one of the above methods to transfer the stencil onto the skin.
Transfer Creams: Transfer creams are available for use as a stencil transfer method. These creams work by creating a temporary tattoo on the skin which can easily be erased or washed off. Apply the cream directly to the skin, then place the stencil on top and press firmly.
How Long Should I Wait Before Applying the Tattoo Ink?
- Wait for the stencil to dry completely: This can take anywhere from a few minutes to an hour, depending on the size and complexity of the stencil.
- Test the stencil: Once the stencil is dry, test it by spraying it with a bit of water. If the water beads up, then the stencil is ready. If not, wait a few more minutes.
- Clean the skin: Before applying the ink, make sure to clean the area with alcohol swabs or rubbing alcohol, to ensure the skin is free of any oils or debris.
- Apply the ink: Once the stencil is dry, the skin is clean and you have all the necessary supplies, you can begin to apply the ink.
How do I protect the tattoo stencil from moisture during application?
When applying a tattoo stencil, make sure to keep it dry. Moisture can cause the stencil to smudge, making the tattoo inaccurate. To protect the stencil, spray it with a light mist of rubbing alcohol or a stencil sealant. Then, let the stencil air dry before continuing with the tattoo. For added protection, you can also apply a thin layer of petroleum jelly to the stencil before spraying it with the sealant.
Conclusion
Using a tattoo stencil is a great way to get the perfect design for your tattoo. It is important to use the right tool for the job, and to follow the instructions carefully. With practice and patience, you will find that it is easy to make a beautiful tattoo that looks exactly the way you want it to.