Are you looking for an easy and comprehensive guide on how to use a tattoo stencil printer? If so, this article will provide you with an easy-to-follow step-by-step guide on how to use a tattoo stencil printer. We will take you through the process of setting up the printer, preparing the stencil, and printing the design. We will also cover the safety considerations associated with tattoo stencil printing. By the end of this article, you will be able to confidently and safely use a tattoo stencil printer.
Contents
What is a Tattoo Stencil Printer
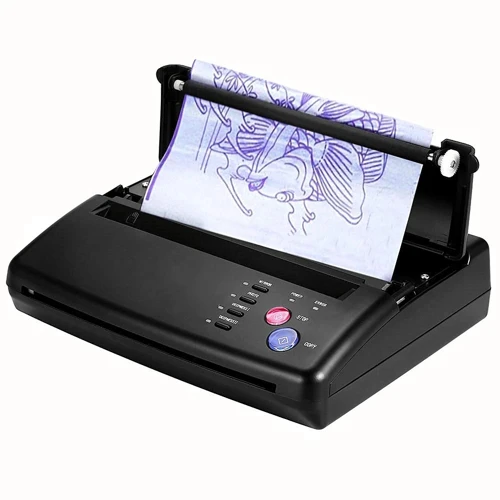
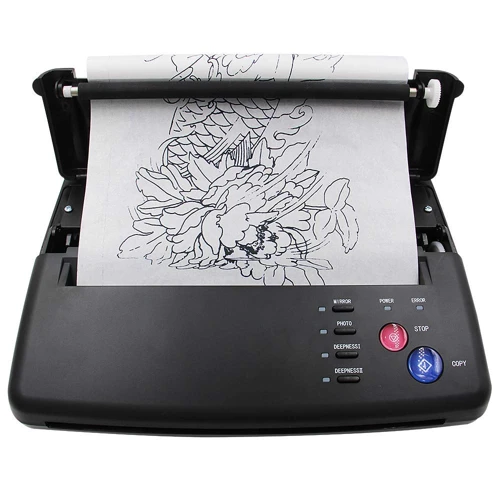
A tattoo stencil printer is a device designed to help tattoo artists quickly and accurately transfer the design from the artist’s original drawing onto the skin of their client. This device can be a great time-saver, and helps ensure that the tattoo design is accurately transferred to the skin in a way that is consistent and easy to read.
Types of Tattoo Stencil Printers
There are several types of tattoo stencil printers available on the market. The most common are thermal, laser, and inkjet printers. Thermal printers use heat to transfer the design onto the stencil paper, while laser and inkjet printers use liquid ink or toner to do the same. Each type of printer has its own advantages and disadvantages, so it is important to choose the one that best suits your needs.
How Does a Tattoo Stencil Printer Work
To use a tattoo stencil printer, the artist first needs to create a design in a graphics program such as Photoshop or Illustrator. Once the design is complete, it is then printed onto a special type of paper that is designed to be used with the printer. The paper is then placed in the printer and the design is printed onto it. Once the design is printed, the stencil is then placed on the skin of the client and the artist uses a special tattoo gun to transfer the design onto the skin.
Using a tattoo stencil printer can be a great way to save time and ensure the accuracy of the tattoo design. With the right printer and a little bit of practice, any artist can create beautiful and accurate designs in no time.
Preparing to Use a Tattoo Stencil Printer
Choosing the Right Printer
When selecting a printer for your tattoo stencils, the most important factor is to make sure it is designed for a thermal transfer printer. This type of printer is specifically designed for transferring tattoo stencils onto the skin. It is also important to make sure that it is compatible with the type of tattoo inks you will be using.
Choosing the Right Tattoo Stencil
Tattoo stencils come in a variety of sizes and shapes. It is important to select a stencil that is the right size and shape for the area of skin you will be tattooing. Additionally, make sure that the stencil is made of a material that is safe to use on skin.
Preparing the Tattoo Stencil Printer for Use
Before using a thermal tattoo printer, it is important to follow the manufacturer’s instructions for preparing the printer for use. This includes calibrating the printer, as well as loading the tattoo stencil into the printer. Additionally, make sure that the printer is properly connected to an electrical outlet or power source.
Using a Tattoo Stencil Printer
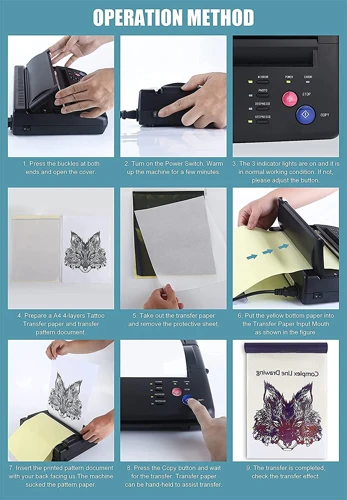
Setting Up the Printer
To begin, make sure your tattoo stencil printer is turned on and the media is loaded correctly. Check that the ink cartridge is full and the stencil paper is in the correct orientation. Ensure the paper is flat and not wrinkled. If the paper is wrinkled, it could cause errors when printing the tattoo stencil.
Printing the Tattoo Stencil
Once the printer is set up, select the print option. Make sure to select the correct settings for printing the tattoo stencil. This will ensure the stencil will be printed correctly. Depending on the type of printer, you may need to adjust the settings accordingly.
Transferring the Tattoo Stencil
Once the tattoo stencil is printed, it needs to be transferred onto the skin. Carefully peel off the printed stencil and place it onto the desired area. Make sure that it is securely placed and no air bubbles are present.
Take a piece of transfer paper and place it on top of the stencil. Rub the transfer paper with a stencil stick until the tattoo stencil is securely transferred. Carefully remove the transfer paper and the tattoo stencil is ready to be inked.
To get the most out of your tattoo stencil printer, it is important to understand how does a tattoo stencil machine work. Knowing the proper way of setting up and operating the printer will help you to achieve the best results when printing tattoo stencils.
Cleaning and Maintaining a Tattoo Stencil Printer
Cleaning the Printer
To keep your tattoo stencil printer in good condition, it is important to clean it regularly. The best way to do this is to use a damp cloth and rubbing alcohol to gently wipe off any dirt or debris that may have accumulated on the outside of the printer. You should also use a vacuum cleaner to get rid of any dust or dirt that may have collected inside the printer.
Checking the Printer
You should also inspect the printer on a regular basis to make sure that all parts are in working order. Make sure that all connections are secure and that the printer is free of any obstructions. If you notice any signs of wear or damage, it is important to replace the damaged parts as soon as possible.
Replacing Ink and Other Parts
If the ink in your tattoo stencil printer is running low, it is important to replace it. To do this, you should refer to the user manual for your specific printer model. In addition, you should also check for any worn or damaged parts and replace them as necessary. Knowing how do tattoo stencil printers work will help you maintain them properly.
Frequently Asked Questions
What type of paper should I use for printing the tattoo stencil?
For printing tattoo stencils, use a plain white, non-coated, heavyweight paper such as cardstock or photo paper. Also, make sure the paper is thick enough to prevent the stencil from smearing. Additionally, using a glossy paper can help preserve the stencil for a longer period of time.
What kind of printer should I use for a tattoo stencil?
Thermal Printer: Thermal printers are the most widely used type of printer for tattoo stencils. They produce the highest quality stencils and have the benefit of being able to produce multiple stencils with ease. They use heat to transfer the stencil onto the skin and can be used for both paper and skin stencils.
Inkjet Printer: Inkjet printers are also a good option for creating tattoo stencils. They use ink to create the stencil and are often less expensive than thermal printers. However, they are not as precise as thermal printers and the stencils may not last as long.
Laser Printer: Laser printers are the most expensive option for creating tattoo stencils. They use laser technology to create the stencils and are the most precise option, but they are also the most expensive.
Other Options:
- Stencil Transfer Paper – This is a special type of paper that can be used to transfer a stencil onto the skin. It is relatively inexpensive and easy to use.
- Hand-drawing – This is the most traditional way of creating a tattoo stencil. It requires great skill and precision, but it is a great way to ensure that your tattoo is exactly the way you want it.
Are there any specific steps I should take to ensure the stencil prints accurately?
Clean the Printer: Always make sure to clean the printer before using it. This ensures that the printer is free of dust, dirt and any other debris that could affect the printing quality.
Check the Ink: Before printing the stencil, check the ink levels of the printer to make sure it is full.
Test Print: Always do a test print to make sure the printer is working properly and the stencil will come out as expected.
Adjust Settings: Adjust the print settings to ensure that the stencil is printed with the desired resolution and size.
Check the Stencil: After printing, check the stencil for any imperfections or errors. If any are found, make the necessary adjustments before applying it to the skin.
What type of ink should I use for the tattoo stencil?
Permanent Ink – A permanent ink is the most popular choice for tattoo stencil application. It is designed to last for many years and will not easily fade away. The ink is made with a special formula that helps to ensure that the tattoo design stays in place for a long time.
Water-Based Ink – A water-based ink is also commonly used for tattoo stencil printing. This type of ink is less likely to cause irritation, as it does not contain any harsh chemicals. However, it is best to use a water-based ink for temporary tattoos, as it may not last as long as permanent ink.
Thermal Ink – Thermal ink is another option for tattoo stencil printing. This type of ink is heated to create a temporary tattoo that will last for several days. It is important to note that thermal ink can only be used on certain types of skin.
Dye-Based Ink – Dye-based inks are another option for tattoo stencil printing. These inks are non-toxic and are not as long lasting as the other types of inks. It is important to note that the colors of dye-based inks may not be as vibrant as the colors of other types of inks.
UV-Absorbing Ink – UV-absorbing inks are designed to be resistant to ultraviolet light. This type of ink is often used for tattoos that will be exposed to direct sunlight for long periods of time. It is important to note that UV-absorbing inks may not last as long as permanent inks.
How Long Does It Typically Take to Print a Tattoo Stencil?
- Design: Most tattoo stencil printers require the design to be loaded into the printer, which can take a few minutes or more depending on the complexity of the design.
- Printing: Once the design is loaded, the printer typically prints the tattoo stencil in a few seconds.
- Curing: Once printed, most tattoo stencil printers require the stencil to be cured with an infrared light, which can take up to a few minutes.
In total, it typically takes up to 10 minutes or more to print a tattoo stencil, depending on the complexity of the design and the curing process.
Conclusion
A tattoo stencil printer is a great way to make sure your tattoos are to the highest standard. By following this step-by-step guide you can easily use a tattoo stencil printer to create perfect tattoos every time. With the right equipment and preparation, you’ll be able to get the perfect tattoo with minimal effort.