Are you new to the world of tattooing and don’t know how to set up a shader tattoo machine? Don’t worry! This step-by-step guide will help you understand all the steps involved in setting up a shader machine correctly so that you can start creating beautiful tattoos with ease. We will cover everything from assembling the machine to choosing the right needle type. So get ready to learn how to set up a shader tattoo machine like a pro!
Contents
What is a Shader Tattoo Machine?
A shader tattoo machine is a machine used to create tattoos by injecting ink into the skin. It is similar to a regular tattoo machine but is designed for shading and color work. The needles used for shading and coloring are usually finer than those used for outlining and allows for more detail.
Shaders are typically used for more intricate, detailed work, such as portrait tattoos, lettering, and script. They require more skill and precision than a traditional tattoo machine and are best used by more experienced tattoo artists.
Shader machines are made of different components, including a frame, motor, needle, and power supply. The frame is typically made of aluminum and is designed to be lightweight and portable. The motor is usually a DC or AC motor that powers the needle. The needle is usually made of stainless steel and is attached to the end of the motor. Finally, the power supply is used to regulate the speed and power of the machine.
When setting up a shader tattoo machine, it is important to ensure that all of the components are properly connected and secured. Make sure to check the alignment of the needle and the power supply before operating the machine. Additionally, it is important to use the correct needle and power supply for the type of work you are doing.
When using a shader tattoo machine, it is important to be aware of the power settings and to adjust them accordingly. This will help ensure that the work is done properly and that the results are consistent. Additionally, it is important to practice on a practice skin or other materials before starting on a real person’s skin.
When it comes to how to set up a tattoo gun for shading, the key is to make sure that all of the components are properly connected and secured. Additionally, it is important to practice on a practice skin or other materials before starting on a real person’s skin. With the proper setup and practice, anyone can become a master of shading and coloring tattoos.
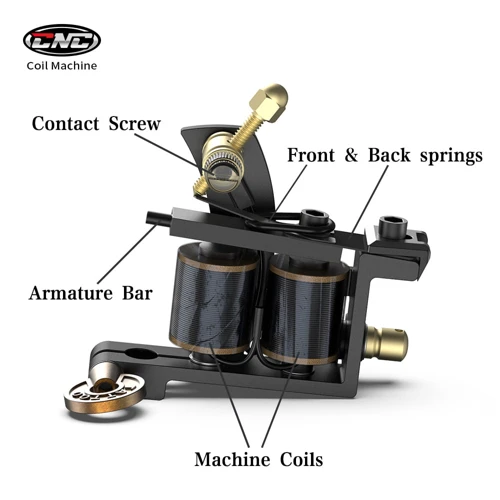
Identifying the Parts of the Shader Tattoo Machine
Tattoo Gun: The tattoo gun is the most important part of the shader machine. It consists of a tube, a motor, a needle, and a power source. The needle is connected to the motor, which moves the needle up and down rapidly to create the design.
Tube: The tube connects the needle to the power source. It helps direct the power from the power source to the needle, enabling the tattoo gun to work properly.
Grips: The grips are the handles that the tattoo artist holds while working with the machine. They provide the artist with a comfortable grip that helps them make precise and accurate designs.
Power Source: The power source is the device that provides power to the tattoo gun. It can be a wall outlet, a battery, or a generator.
Foot Switch: The foot switch controls the power to the tattoo gun. When the foot switch is pressed, the power is turned on and the needle starts moving. When the foot switch is released, the power is turned off and the needle stops moving.
Needles: Needles are used to create the tattoo design. They come in a variety of sizes and shapes, depending on the type of design being created.
Inks: Inks are used to create the colors in the design. Different types of inks are used for different colors and effects.
Preparing the Shader Tattoo Machine
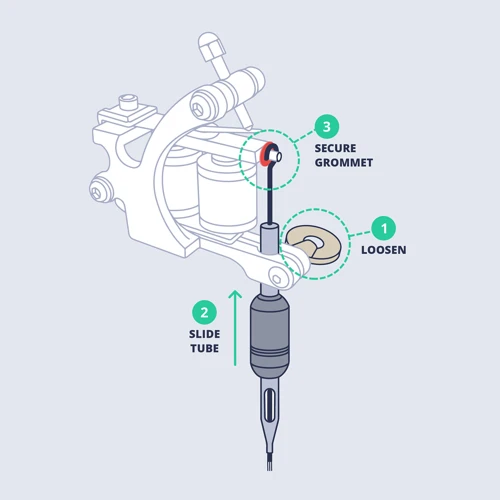
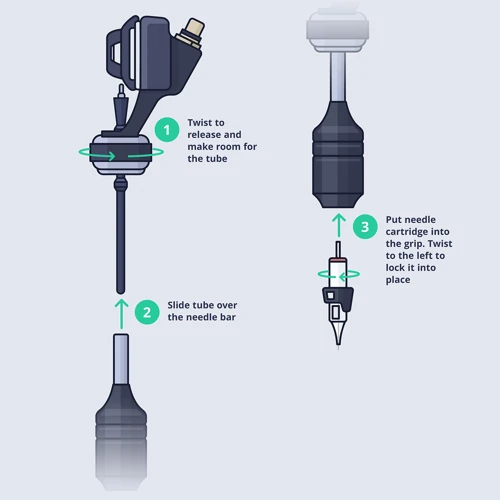
Step 1. Assemble the shader tattoo machine. First, attach the needle to the armature bar. Secure the needle to the armature bar using the needle clamp, a small metal clamp with a thumbscrew. Once the needle is secure, attach the armature bar to the tube. Secure the armature bar in place using the same thumbscrew.
Step 2. Attach the power cord. Plug the power cord into the back of the shader tattoo machine. Plug the other end into the power source. Make sure the power switch is in the “off” position before plugging it in.
Step 3. Secure the frame. Place the frame on the table and secure it in place using the clamps. Make sure the frame is firmly secured to the table.
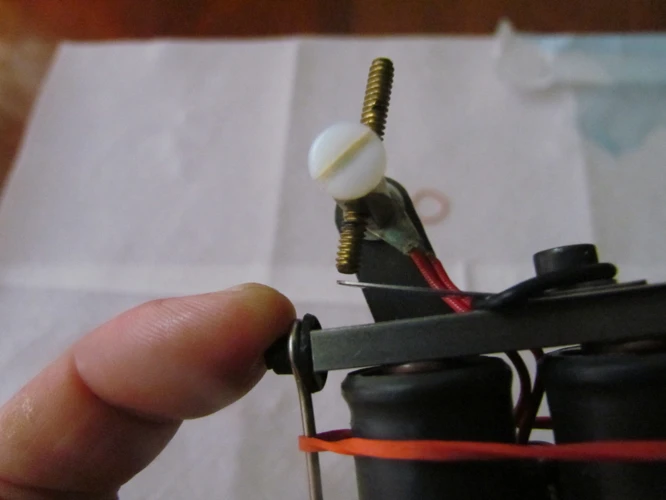
Step 4. Attach the spring. Take the spring and attach it to the frame. Secure the spring in place with the thumbscrew.
Step 5. Attach the armature bar to the frame. Place the armature bar in the frame and secure it in place with the thumbscrew. Make sure the armature bar is firmly secured to the frame.
Step 6. Connect the power cord. Connect the power cord to the power source. Make sure the power switch is in the “on” position.
Step 7. Attach the tube. Place the tube in the frame and secure it in place with the thumbscrew. Make sure the tube is firmly secured to the frame.
Step 8. Connect the needle. Connect the needle to the armature bar. Secure the needle in place using the needle clamp.
Step 9. Check the connections. Check all the connections to make sure they are secure. Make sure the power cord is connected to the power source and the needle is securely connected to the armature bar.
Step 10. Test the machine. Turn on the power switch and test the machine. Make sure the machine is running smoothly and that the needle is moving correctly.
Step 11. Clean the machine. Use a damp cloth to wipe down the machine and ensure that it is completely clean.
Step 12. Sharpen the needle. Use a needle sharpener to sharpen the needle. Make sure the needle is sharp enough to create a clean line.
Step 13. Set the speed. Set the speed on the machine to the desired setting. Make sure the machine is running at the correct speed before beginning the tattoo process.
Adjusting the Voltage

| Voltage | Speed |
|---|---|
| 8-9V | Slow |
| 9-10V | Medium |
| 10-11V | Fast |
The voltage of a shader tattoo machine needs to be adjusted in order to get the desired speed of the tattooing process. To ensure the tattoo machine is working properly, the voltage should be within the range of 8-11 volts. A voltage range of 8-9V will result in a slow speed, whereas a voltage range of 9-10V will result in a medium speed and a voltage range of 10-11V will result in a fast speed.
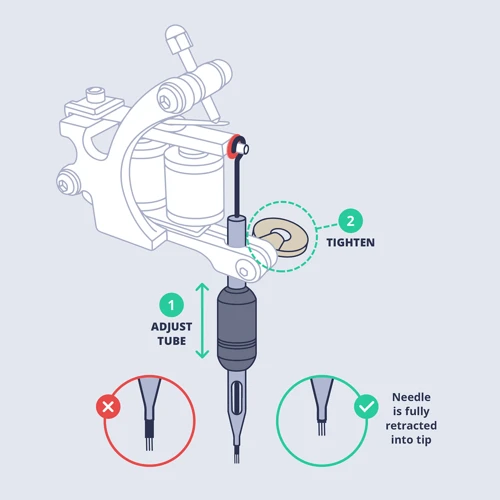
Setting the Needle Depth
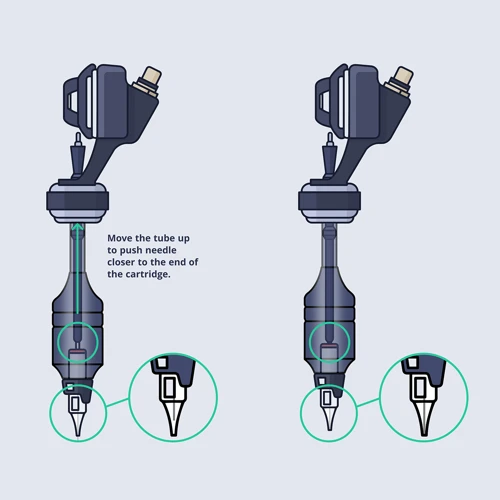
- The needle depth should be adjusted until the tip of the needle just breaks the skin surface. It should not be too deep to cause unnecessary trauma or too shallow to be ineffective.
- The correct needle depth is one of the most important steps when setting up a shader tattoo machine.
- The needle should be adjusted to the right depth so that the tattoo artist has enough control to create clean lines and shades.
- The needle depth should be adjusted to the desired depth by turning the needle bar. This is usually done by using a special tool.
- The needle depth should be adjusted to the right depth before starting the tattoo. This will ensure that the lines and shades are clean and even.
- The needle depth should be checked regularly throughout the tattooing process to make sure it is still at the desired depth.
Setting the Needle Groupings
It is important to set the needle groupings correctly to get the desired effect of the tattoo. To do this, the needles should be grouped in a linear pattern. This means that the needles should be lined up in a straight line, with each needle spaced the same distance apart from the one before and the one after it. Start by determining how many needles are needed to achieve the desired effect. If a more complex design is desired, a larger number of needles may be required. Once the desired number of needles is determined, they should be placed in the desired pattern.
Begin by placing the first needle at the top of the linear pattern. Make sure that the needle is securely attached to the armature bar. After the first needle is secured, place the second needle next to it and make sure that it is placed the same distance away from the first needle. Repeat this step until all of the needles are placed in the desired pattern. Make sure that there is an equal distance between each needle.
Once the needle groupings have been set, use a power supply to test the machine. This will ensure that the needles are evenly spaced and that the machine is working correctly. If there are any problems with the power supply or with the needle groupings, make any necessary adjustments before continuing.
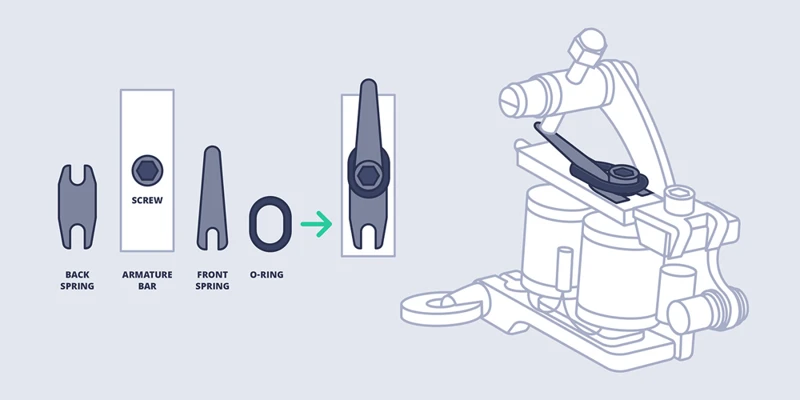
Adjusting the Armature Bar
- Attach the armature bar to the rear of the frame. Make sure the armature bar is securely fastened to the frame and the screws are tightened.
- Adjust the armature bar. To adjust the armature bar, use a flat-head screwdriver or allen wrench to turn the screws on the armature bar. Turn the screws clockwise to increase tension on the armature bar, or counterclockwise to reduce tension.
- Check the armature bar. When adjusting the armature bar, check the movement of the needle. If the needle moves too much or too little, adjust the armature bar again until the movement of the needle is just right.
Setting the Contact Screw
Setting the contact screw is an important part of setting up a shader tattoo machine. It is used to adjust the voltage of the machine and thus the amount of power sent to the needle.
- The contact screw should be adjusted to the lowest possible setting that still allows the machine to run smoothly.
- When adjusting the contact screw, you should turn it slowly and in small increments.
- If the contact screw is set too high, there will be too much power sent to the needle and this can cause the needle to become too hot and cause excessive damage to the skin.
- If the contact screw is set too low, the machine will not run smoothly and can cause the machine to malfunction.
- When setting the contact screw, the machine should be turned on and running at the desired speed before turning the contact screw.
- The contact screw should also be checked periodically to ensure that it is still set correctly.
By following these steps and setting the contact screw correctly, you can ensure that your shader tattoo machine is running optimally and is not causing any unnecessary damage to the skin. Knowing how to set up a shader tattoo machine correctly is essential for beginners and experienced tattoo artists alike.
Testing the Shader Tattoo Machine
Once you have set up your shader tattoo machine, you need to ensure it is functioning correctly. The first step is to check the voltage of the machine. You can do this by adjusting the knob on the back of the machine. If the voltage is too low, the machine will not be able to create the desired effect in the tattoo.
Next, you should check the contact screws are tight. Loose contact screws can cause the machine to miss strokes and create uneven lines. Make sure the contact screws are not over tightened either, as this can also cause the machine to miss strokes.
You should then check the machine is running smoothly and that the needles are working correctly. To do this, you can draw a simple line or dot on a piece of paper. If the machine is not running smoothly, you may need to adjust the springs or replace the needle.
Once you are satisfied that the machine is running correctly, you can begin to test it on your skin. Start with a low voltage and gradually increase it until you find the desired effect. It is important to take your time and not to go too high too quickly.
Finally, make sure you clean the shader tattoo machine regularly. This will keep the machine running smoothly and prevent any infections or skin irritation.
Once you have tested your shader tattoo machine, you can begin to create beautiful, intricate tattoos. Following these steps will help ensure that you have a successful and enjoyable tattooing experience.
Frequently Asked Questions
What type of shader tattoo machine should I use?
For a shader tattoo machine, it is important to choose one with adjustable speed and needle depth. Look for one with a good weight balance, as this will reduce fatigue over long tattoo sessions. It is also important to make sure that the machine is well-maintained and free from rust or other damage. Look for machines with a good reputation from well-known manufacturers. Consider the size of the machine, as some may be too large for the area of skin you are working on. Ultimately, the most important consideration is to choose the machine that best fits your style and preferences.
How do I ensure the machine is set up correctly?
-
1. Check the Machine – Make sure the machine is in working condition and all necessary parts are present. Check for any loose connections and make sure the power cord is securely attached to the machine.
2. Check the Needles – Make sure the needles are securely fastened and that the tips are sharp. Replace any worn or dull needles.
3. Set the Voltage – Set the voltage on the machine to the recommended setting for the particular shader and the type of ink you are using.
4. Check the Contact Point – Make sure the contact point is clean and free of any dirt or debris.
5. Test the Machine – Test the machine by running it on a piece of paper or other material. Make sure the machine is running smoothly and the needles are moving correctly.
6. Clean the Machine – After each use, make sure to clean the machine with a damp cloth or rubbing alcohol. This will help keep the machine in good working condition and prevent any bacteria from spreading.
Are There Any Safety Concerns to Consider?
- Cross-Contamination: To prevent cross-contamination, ensure that the tattoo machine is properly sterilized before and after use. Disinfectant wipes and other cleaning products should be used on the machine and the surrounding area.
- Needles: Disposable needle cartridges should be used to ensure that each client has a fresh needle for their tattoo. The needles should be disposed of in a sharps container after each use.
- Protective Gear: Wear protective gloves and a face mask while tattooing to prevent exposure to bodily fluids. Additionally, wear safety glasses to protect your eyes from splatters.
- Electric Shock: Make sure that the machine is properly grounded and the power cord is not frayed or damaged in any way. Unplug the machine when it is not in use.
What additional supplies do I need to get started?
- Tattoo Ink: You will need a variety of colors of tattoo ink for shading and outlining. Choose a brand that is approved for use on humans.
- Tattoo Needles: For shading, you will need a shader needle. This is a needle that is curved and has several sharp points. You will also need a liner needle for outlining.
- Tattoo Gloves: Disposable gloves are essential for maintaining sanitary conditions while tattooing.
- Ink Caps: You will need ink caps to hold the ink while you are tattooing.
- Paper Towels: Paper towels are important for cleaning up any spills and wiping down the area.
- Stencil Paper: If you are drawing your own designs, you will need stencil paper.
- Goggles: Safety goggles are necessary for protecting your eyes from any flying particles.
How do I adjust the needle depth?
- Check the manufacturer’s instructions to ensure the correct needle depth is set for the type of tattoo you are doing.
- Unscrew the needle bar locking screw, located on the underside of the needle bar.
- Adjust the needle depth by sliding the needle bar up or down until the desired depth is reached.
- Secure the needle bar in place with the locking screw.
Conclusion
Setting up a shader tattoo machine is not as difficult as it may seem. With the right parts, tools, and a little bit of patience, anyone can have their shader tattoo machine up and running in no time. Following the steps outlined in this guide, beginners should have no trouble getting their shader tattoo machine ready for operation.