Are you looking for a step-by-step guide on how to print tattoo stencils with an inkjet printer? If so, you’ve come to the right place. This article will walk you through the process of printing tattoo stencils with an inkjet printer, starting with the materials and supplies needed and ending with the finished product. By following these simple steps, you’ll be able to print your own tattoo stencils with ease.
Contents
Materials Needed
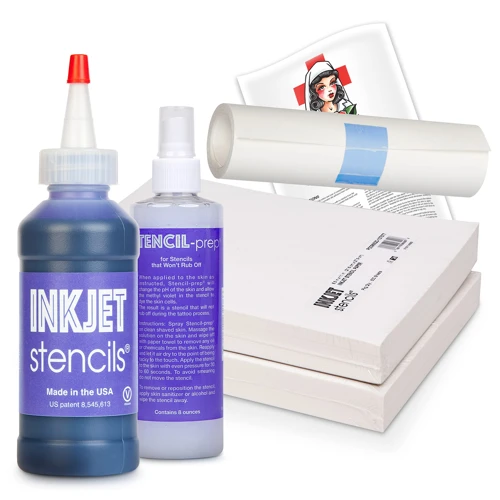
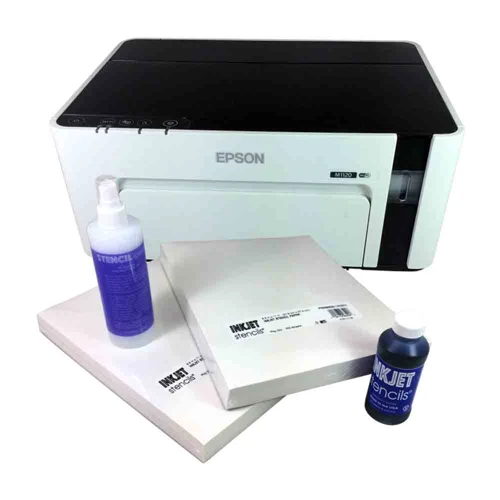
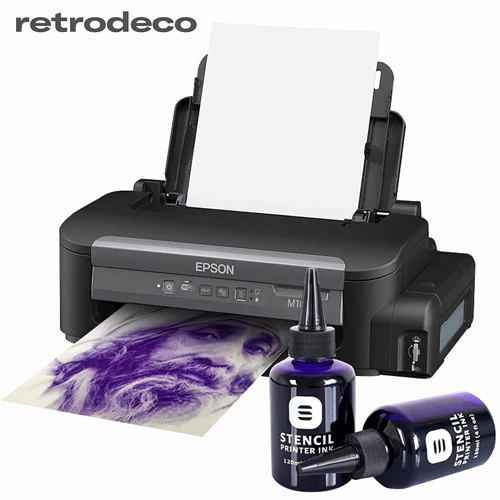
- Inkjet Printer – It is important to have an inkjet printer for making a tattoo stencil with an inkjet printer.
- Tattoo Stencil Paper – It is available at any tattoo supply store and it is specially designed for making tattoo stencils.
- Transfer Paper – This is used to transfer the stencil pattern onto the skin. It is also available at tattoo supply stores.
- Inkjet Printer Ink – It is important to use an inkjet printer ink that is suitable for tattoo stencils.
- Tattoo Pen – It is used to draw the stencil pattern onto the skin.
Using an inkjet printer to make a tattoo stencil is a relatively easy process that can be done in a few simple steps. To start, make sure you have all the materials needed to make a tattoo stencil with an inkjet printer – an inkjet printer, tattoo stencil paper, transfer paper, inkjet printer ink, and a tattoo pen.
Designing and Creating the Tattoo Stencil
The tattoo stencil is the first step in creating a tattoo. Without a good stencil, the results will be subpar. The design should be carefully thought-out and created with precision.
Designing – Start by creating a design that is both aesthetically pleasing and easy to work with. This can be done with pencil and paper, or digitally using software such as Adobe Photoshop. Keep in mind that the finer the detail, the harder it will be to create a successful stencil.
Creating – Once the design is complete, it’s time to create the stencil. This can be done with a variety of methods, such as hand-cutting, using a stencil-cutting machine, or using a laser cutter. If using a laser cutter, make sure to use an appropriate material such as acetate or Mylar.
Transferring – Once the stencil has been created, it’s time to transfer it to the skin. This can be done with a variety of methods, such as using a transfer paper, or directly tracing the stencil onto the skin. Make sure to use a light hand and be careful not to smudge the design.
Finally, the stencil is ready to be printed with an inkjet printer. With a good design and a well-made stencil, the results will be sure to impress.
Prepping the Tattoo Stencil for Printing
The next step is to prep the tattoo stencil for printing. To do this, the stencil must be cleaned, disinfected, and dried. Start by using a clean rag to wipe down the stencil. Then, use a hospital-grade disinfectant to sanitize the stencil. Finally, use a hair dryer or fan to completely dry the stencil. Once the stencil is dry, it will be ready to be printed with an inkjet printer.
Setting Up the Inkjet Printer for Printing the Tattoo Stencil
1. Gather the materials
- Inkjet printer
- Tattoo stencil paper
- Computer with internet connection
- Tattoo stencil image
- Printing software
2. Install the appropriate printing software
- Download and install the appropriate software from the manufacturer’s website.
- Follow the on-screen instructions to complete the installation.
3. Connect the printer to the computer
- Connect the printer to the computer using a USB cable.
- Turn on the printer and make sure it is connected to the computer.
4. Adjust the printer settings
- Open the printing software on the computer.
- Set the paper size to the size of the tattoo stencil paper.
- Set the print quality to the highest setting.
- Choose the type of paper you are using.
- Select the print mode as “photo” or “fine art”.
5. Load the tattoo stencil paper into the printer
- Carefully slide the tattoo stencil paper into the printer tray.
- Make sure it is loaded properly and securely.
6. Print the tattoo stencil image
- Open the tattoo stencil image in the printing software.
- Check the preview of the image before printing.
- Adjust the settings if necessary.
- Click on the “Print” button to start the printing process.
Printing the Tattoo Stencil
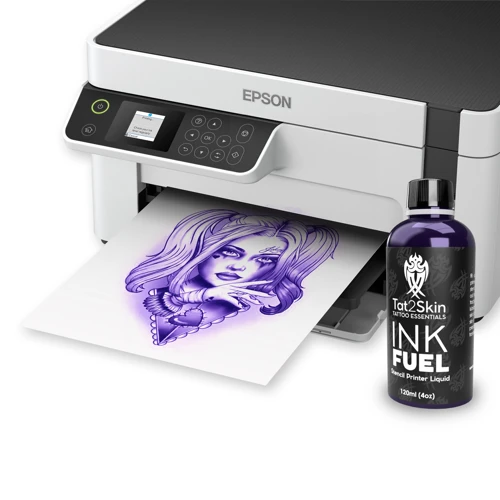
Once the design is finalized and all the details are in place, it’s time to print the tattoo stencil. Start by using a high-resolution image that is dark enough to appear clearly on the skin. This is important, as the tattoo will only look as good as the stencil, so take your time and get it right.
Once the image is ready, open an inkjet printer and load it with tattoo stencil paper. Most types of tattoo stencil paper are designed to work with inkjet printers, however, it’s best to check the manufacturer’s instructions to make sure it is compatible.
Once the paper is loaded, set the printer to the highest quality setting. This will ensure that the stencil prints out clear and crisp. Now, print out the stencil.
Once the stencil is printed, it’s important to check that it’s the right size and that all the details are visible. If the resolution is too low, the stencil may not be usable. If the stencil looks good, it’s now ready to use.
Finishing the Tattoo Stencil

- Burnishing: The final step is to burnish the paper onto the skin to make sure the stencil is transferred onto the skin. This can be done using a pen, paper clip or other smooth object.
- Peel Off: The paper should be peeled off slowly and carefully to avoid any smudging.
- Clean Up: Finally, use a damp cloth to clean up any residue left behind by the paper.
Once all these steps are completed, the tattoo stencil should be ready for the artist to work with. After the initial stencil is placed on the skin, the artist can use their own creativity to finish the design.
Applying the Tattoo Stencil
Once the tattoo stencil has been printed, it’s time to apply it to the skin. Make sure that the skin is clean and dry. Lightly dab the stencil with a damp cloth or the back of a spoon. This will help the stencil adhere to the skin. Once the stencil is placed on the skin in the desired location, use a cotton swab to press down the stencil firmly. This will help the stencil stick to the skin. After the stencil has been applied, let it sit for a few minutes to allow the stencil to dry onto the skin. Once the stencil has dried, use a transfer paper to trace the stencil onto the skin. Use the transfer paper in a gentle rubbing motion to ensure that the stencil is transferred correctly. Once the stencil has been traced onto the skin, the tattoo can be applied.
Troubleshooting
If you’re having trouble printing a tattoo stencil with your inkjet printer, here are some troubleshooting tips:
- Check that your printer is compatible: Make sure your printer is compatible with the software you’re using and with the type of tattoo stencil you are creating.
- Check the ink levels: Make sure the ink levels are adequate for printing your tattoo stencil.
- Check the settings: Make sure the settings are correct for printing a tattoo stencil. This includes resolution, paper size, and color settings.
- Check the paper: Make sure the paper you are using is suitable for printing a tattoo stencil.
- Check the printer connections: Make sure all the connections to your printer are secure and working properly.
If none of these tips solve your issue, you may need to consult a professional or seek out additional advice on how to print a tattoo stencil with an inkjet printer.
Frequently Asked Questions
What type of paper should be used for printing a tattoo stencil?
Tattoo stencil paper is the best option for printing tattoo stencils. It is specially designed for use with inkjet printers and is specifically formulated for use with tattoo transfer inks. It features a specially coated surface that allows for the transfer of the stencil onto the skin with ease and accuracy. Here are some features of tattoo stencil paper:
- Highly absorbent, allowing for the transfer of stencils with precision
- Compatible with all types of inkjet printers
- Provides clear, sharp lines with minimal smudging
- Features a special coating that prevents smudging, smearing, or spreading of the tattoo stencil
Tattoo stencil paper is an essential tool for any tattoo artist and is the best option for creating tattoo stencils for use with an inkjet printer.
Is it Possible to Print a Stencil for a Complex Tattoo Design?
Yes, it is possible to print a stencil for a complex tattoo design with an inkjet printer. However, it requires a great deal of skill and experience to create a successful stencil that can be used in the tattooing process. The printer needs to be calibrated correctly to ensure a good quality stencil, and the design needs to be transferred onto the skin accurately. For best results, it is recommended to consult a professional tattoo artist to create the stencil.
How Long Does It Take To Print A Stencil With An Inkjet Printer?
Printing a tattoo stencil with an inkjet printer usually takes about 5 minutes, depending on the complexity of the design and the print settings used. The stencil should be printed on transfer paper to ensure the quality of the print.
What Type of Ink Should be Used for Printing a Stencil?
For printing a tattoo stencil, use alcohol-based ink. This type of ink is designed to resist fading and smudging, ensuring that the stencil is crisp and clear. Alcohol-based inks also dry quickly, reducing the risk of smudging when transferring the stencil to the skin.
Are there any tips for ensuring a successful print?
- Check the printer settings: Check your printer settings to ensure you are printing in the highest quality setting. Make sure you are printing in the correct color mode, such as CMYK or grayscale.
- Use quality ink: Use quality ink that is designed for your printer. Make sure to replace the ink cartridges regularly to ensure the best results.
- Use a clean surface: Make sure to use a clean surface for printing, such as a clean piece of paper or a clean cloth. This will ensure that the stencils will print properly and that the ink will not smudge.
- Use a quality paper stock: Use a quality paper stock such as cardstock or photo paper. These paper stocks provide better detail and color saturation than regular printer paper.
- Clean the print head: Make sure to clean the print head regularly to ensure that the ink is applied evenly and that the prints are of the best quality.
Conclusion
Printing tattoo stencils with an inkjet printer is a cost-effective and efficient way of creating intricate designs for tattooing. The process is simple and requires minimal equipment, so it’s a great choice for those just starting out with tattooing. With the right settings, an inkjet printer can produce highly detailed stencils with a professional-looking finish.
References
- How to Print Tattoo Stencils With an Inkjet Printer [dummies.com]
- Tattoos and Permanent Makeup [fda.gov]
- Tattoos [health.ny.gov]