Are you thinking of getting a new tattoo but don’t know how to apply the tattoo stencil? Don’t worry, you’re not alone! Applying a tattoo stencil correctly is a crucial step in ensuring that your tattoo turns out perfectly. In this article, we’ll provide you with some tips on how to apply tattoo stencils for a perfectly tattooed result each and every time.
Contents
Materials and Tools Needed
- Tattoo stencil paper: This is a special type of paper designed to transfer the tattoo design onto the skin. It comes in both temporary and permanent varieties.
- Transfer cream: Transfer cream is used to hold the stencil in place and make it easier to transfer it to the skin.
- Tattoo machine: This is the tool used to actually create the tattoo. It consists of a needle, a tube, and a motor.
- Ink: A variety of inks are used in tattooing, including black and colored inks.
- Gloves: Disposable gloves are used to protect the tattoo artist and client from contamination.
- Gauze: Gauze is used to clean the area before and after the tattoo is applied.
- Antiseptic: Antiseptic is used to clean the skin before and after the tattoo is applied.
These are the materials and tools needed to apply a tattoo stencil. To learn how do you put a tattoo stencil on the skin, continue reading for some tips on getting a perfect tattoo every time.
Prepping the Skin
Before applying the tattoo stencil, it is important to properly prepare the skin. This will ensure that the stencil stays in place while the tattoo artist works.
1. Clean the Skin
It is important to clean the area that the tattoo will be applied to. This will help to remove any dirt, oil, and sweat that may affect the tattooing process. Use a mild soap and warm water to clean the area, then rinse and pat dry.
2. Shave the Area
Using a razor, carefully shave the area where the tattoo will be applied. This will help to make the area smooth and even, which will make it easier to apply the stencil accurately.
3. Apply a Disposable Barrier Film
Once the area is clean and shaved, apply a disposable barrier film to the area. This will help to protect the skin from infection and irritation.
4. Apply a Lubricating Gel
After the barrier film is in place, apply a lubricating gel to the area. This will help the stencil to glide across the skin, making it easier to apply the tattoo accurately.
| Step | Action |
|---|---|
| 1 | Clean the Skin |
| 2 | Shave the Area |
| 3 | Apply a Disposable Barrier Film |
| 4 | Apply a Lubricating Gel |
Prepping the skin is an important part of the tattooing process. Taking the time to properly prepare the skin will help to ensure that the tattoo stencil is applied accurately and will stay in place while the tattoo artist works.
Tracing the Stencil
Once you have selected your tattoo design, the next step is to trace the stencil onto the skin. This step is important to ensure a perfect tattoo every time.
Materials Needed:
| Tattoo Stencil | Transfer Paper |
| Tissue Paper | Sterile Gloves |
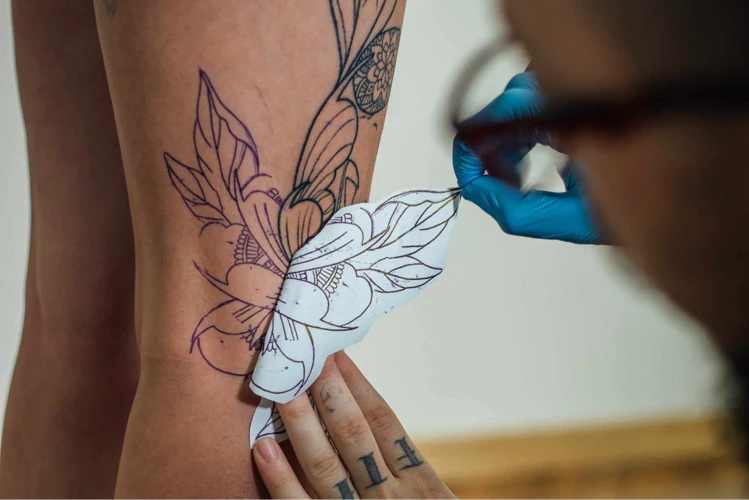
To begin, put on a pair of sterile gloves to avoid cross contamination. Place the stencil onto the skin and hold it in place using tissue paper. Once the stencil is secured, trace the outline of the design using transfer paper. The transfer paper should be held firmly against the skin to ensure a precise outline.
Continue tracing the design until the entire stencil is transferred onto the skin. Once the tracing is complete, remove the tissue paper and stencil. The next step is to apply the ink to the tracing.
Lining the Tattoo
Once the stencil is in place, it’s time to line the tattoo. Start by using a thin layer of lubrication or liner gel to prepare the area. This helps the needle to move more smoothly and the ink to be absorbed. Then, use a machine or a rotary machine to draw the outline of the tattoo. Move slowly and carefully, and make sure to keep a steady pressure.
When you’re done, clean the area with a damp cloth to remove any excess ink. Finally, apply a thin layer of ointment to soothe the skin and help keep it moisturized.
By following these steps, you can be sure that your tattoo will look exactly as you imagine it. So take your time and get it right the first time.
Shading the Tattoo
| Step | Instructions |
|---|---|
| 1 | Choose a shading needle and carefully attach it to your tattoo machine. |
| 2 | Set the machine to a safe speed and start shading the tattoo. |
| 3 | Move the machine slowly in the same direction as the stencil lines. |
| 4 | Build up intensity of the shading as you go to create a more realistic look. |
| 5 | After shading is complete, wipe away any excess ink with a paper towel. |
| 6 | Once the tattoo is completely dried, apply a thin layer of ointment to the area. |
Shading the tattoo should always be done with great care and precision. The process involves choosing a shading needle and carefully attaching it to your tattoo machine. Next, set the machine to a safe speed and start shading the tattoo. Move the machine slowly in the same direction as the stencil lines. You should build up intensity of the shading as you go to create a more realistic look. After shading is complete, wipe away any excess ink with a paper towel. Once the tattoo is completely dried, apply a thin layer of ointment to the area.
Finishing the Tattoo
- Check for mistakes: Take a step back and look for any places you missed or any mistakes. If you find any, fix them before moving on.
- Apply the ink: Carefully apply the ink to the stenciled area, making sure to stay within the lines. Be sure to wipe off any excess ink.
- Clean up: Once the tattoo is finished, clean the area carefully with a clean cloth and some mild antibacterial soap.
- Finish: Apply a thin layer of petroleum jelly or a healing ointment to the tattoo and cover with a bandage. Leave the bandage on for several hours to help the skin heal.
Aftercare Tips
- Keep the area clean – Clean the area around the tattoo with lukewarm water and a mild, unscented soap. Pat the area dry with a clean towel and allow the tattoo to air dry for a few minutes. Do not re-bandage the tattoo.
- Apply a thin layer of aftercare product – After the tattoo is completely dry, apply a thin layer of aftercare product, such as A&D ointment or a tattoo-specific lotion. Avoid using petroleum jelly or vaseline, as these products can cause the ink to fade.
- Wash the area twice a day – Wash the tattoo area twice a day with lukewarm water and a mild soap. Be sure to pat the area dry with a clean cloth and apply a thin layer of aftercare product.
- Avoid direct sunlight – Avoid exposing the tattoo to direct sunlight or UV light for the first few weeks. If you must go out in the sun, make sure to wear clothing that covers the tattoo and apply a high-SPF sunscreen to the area.
- Moisturize regularly – Keep the area moisturized by applying a thin layer of aftercare product at least twice a day. Avoid using any products with fragrances or dyes, as these can irritate the skin and cause the ink to fade.
- See a doctor if necessary – If the tattoo area becomes red, swollen, or painful, contact a doctor immediately. It is important to get medical attention if these symptoms occur, as they could be a sign of infection.
Frequently Asked Questions
What Type of Stencil Should I Use When Applying a Tattoo?
When applying a tattoo, it is important to use the right type of stencil. The most commonly used stencils are adhesive and paper stencils. Adhesive stencils are easy to apply, as they come with a special adhesive backing that can be applied directly to the skin. Paper stencils are more durable and can be used multiple times. They are best used with a transfer fluid, which allows the tattoo to be transferred to the skin with precision.
Is it necessary to use a stencil when getting a tattoo?
Yes! Using a stencil is essential in order to ensure a perfect and accurate tattoo. Stencils provide a clean outline of the tattoo design, which helps to make sure that the tattoo is applied in the right place and in the right size. Stencils also make it easier for the tattoo artist to apply the design in one clean stroke, without any smudges or errors.
How do I ensure that the stencil is properly placed on the skin?
To ensure the stencil is placed correctly, start by marking the area with a washable marker. Wipe away the excess and spray the stencil with a light adhesive to hold it in place. Make sure to check the positioning before continuing with the tattoo. If necessary, use a ruler and a square to ensure the stencil is straight and symmetrical. Finally, press firmly on the stencil and hold for a few seconds to ensure it is properly transferred.
What are the best practices for removing the stencil after the tattoo is complete?
Once the tattoo is complete, the stencil should be removed carefully. It is important to take precautions to avoid infection and contamination, so the stencil should be disposed of properly. To remove the stencil, use a pair of tweezers to slowly and carefully peel it away from the skin. Once the stencil has been removed, the area should be washed with warm, soapy water to remove any remaining residue. The skin should then be treated with an antiseptic to reduce the risk of infection. Finally, the area should be covered with a bandage or dressing to protect it.
How can I best prevent smudging or smearing of the stencil design?
To prevent smudging or smearing of the stencil design, make sure to use stencil transfer paper that is specifically designed for tattoos. Choose a transfer paper that is specifically designed for use with stencils and will not easily smudge or smear. Additionally, use a clean paper towel with rubbing alcohol to remove any excess ink from the area before applying the stencil. Finally, be sure to carefully remove the stencil after it has been applied and let the skin dry for a few minutes before beginning the tattoo.
Conclusion
Applying a tattoo stencil correctly is an essential part of the tattoo process. It helps to ensure that your tattoo will look as perfect as possible. Taking the time to prepare your skin, apply the stencil correctly, and use the necessary supplies will help you get the perfect tattoo.