Are you interested in trying something new and creative? If so, why not consider making your own henna tattoos? This guide will provide you with a step-by-step guide on how to make your own henna tattoos, from gathering the necessary supplies to applying the henna to your skin. With a little bit of patience and creativity, you can create beautiful and unique henna tattoos in the comfort of your own home!
Contents
What are Henna Tattoos?
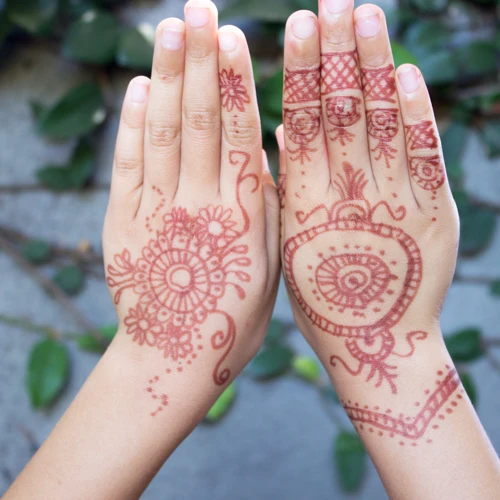
Henna tattoos, also known as Mehndi, are an ancient form of body art that originated in the Middle East and India. These temporary tattoos are created by applying a paste made from the powdered leaves of a henna plant to the skin. The paste is left on the skin for several hours, and when it is removed, it leaves behind a beautiful and intricate design. Henna tattoos are popular for special occasions, such as weddings, parties, and festivals.
How to Make Temporary Henna Tattoos:
- Gather the necessary materials: henna powder, lemon juice, sugar, and essential oils.
- Mix the henna powder with lemon juice and sugar to form a thick paste.
- Add a few drops of essential oil to the paste to help it adhere to the skin.
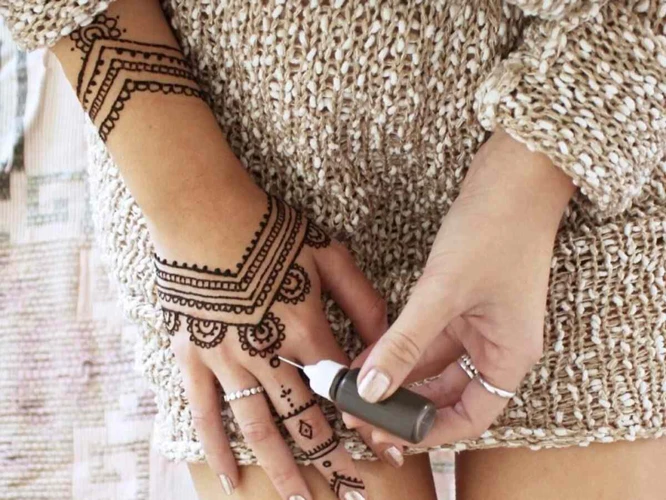
- Using a toothpick or a plastic cone, apply the henna paste to the desired area of the skin.
- Allow the henna paste to dry for at least 4-6 hours.
- Gently remove the dried paste and discard it.
- Enjoy your temporary henna tattoo!
Henna tattoos are a great way to express yourself without the commitment of a permanent tattoo. They typically last anywhere from 1-3 weeks, depending on where they are placed and how often they are exposed to water. With henna, you can easily create unique and beautiful designs that will add a special touch to any occasion.
What You Need to Make Your Own Henna Tattoos

- Henna Powder: To get started, you’ll need some henna powder. This is the main ingredient in henna tattoos, and you’ll use it to create the paste that is applied to the skin. Look for all-natural henna powder with no added chemicals or dyes.
- Lemon Juice: Lemon juice is used to mix with the henna powder to create the paste. The acidity of the lemon juice helps to release the dye molecules in the henna powder and this is what makes the tattoos last longer.
- Essential Oils: Essential oils are added to the henna paste to enhance the color and also help the paste keep its consistency. Popular essential oils used for henna tattoos include lavender and eucalyptus.
- Sugar: Sugar is also added to the henna paste to help the paste keep its consistency and to help the paste adhere to the skin for longer periods of time.
- Henna Applicator Bottle: You’ll need a henna applicator bottle to apply the henna paste to the skin. These bottles come in various sizes and shapes, and you can find them online or in craft stores.
- Plastic Wrap: Plastic wrap is used to keep the henna paste moist while it is on the skin. This helps the dye molecules to stay activated and helps the color of the tattoo to last longer.
- Paper Towels: Paper towels are used to clean up any henna paste that gets on the skin or clothing. This is especially important if you’re using dark or black henna, as it can stain skin and clothing.
Step-by-Step Guide for Making Your Own Henna Tattoos

Preparing the Henna Paste
Gather the ingredients: To make your own henna paste, you will need henna powder, lemon juice, a few drops of essential oil, and a bowl.
Mix the paste: In the bowl, mix the henna powder with the lemon juice until it forms a thick paste. Add a few drops of essential oil to the paste and mix until it is completely incorporated.
Applying the Henna Paste
Apply the paste: Use a clean paint brush or applicator bottle to apply the henna paste to the skin in the desired design.
Allow the paste to dry: Allow the paste to dry until it is completely dry and forms a crust.
Creating the Design
Create the design: Using a toothpick or other pointed object, draw the desired design on the skin.
Fill in the design: Fill in the outlines of the design using the henna paste.
Setting the Henna Tattoo
Cover the design: Once the design is complete, cover it with a light layer of oil to help set the henna.
Leave the design: Leave the design in place for at least an hour before removing the henna paste.
Removing the Henna Paste
Peel off the paste: Gently peel off the henna paste from the skin.
Clean the skin: Wash the skin with soap and water to remove any remaining henna paste.
Tips for Making Temporary Henna Tattoos
- Choose the Right Henna: Make sure you’re using natural henna paste that’s specifically designed for body art. Avoid pre-mixed henna products, as they may contain ingredients that can cause skin irritation.
- Prepare the Henna: Mix the henna paste with a few drops of lemon juice and some sugar. This helps to activate the dye and make the henna last longer.
- Apply the Henna: Use a toothpick or a small cone-shaped applicator to draw the design onto the skin. The paste will dry quickly, so make sure you’re ready to start drawing. Once the henna is dry, it will stay in place for several days.
- Keep the Henna on for Longer: To make the henna last longer, cover the design with a thin layer of Vaseline or olive oil and wrap with plastic wrap. This helps the henna stay in place and absorb into the skin.
- Let the Henna Set: Once you’ve applied the henna, let it sit for several hours or overnight. This will help the henna set into the skin and make it last longer.
- Remove the Henna: Once you’re ready to remove the henna, use a damp cloth to gently rub away the paste. The henna may take several days to completely fade away.
Aftercare
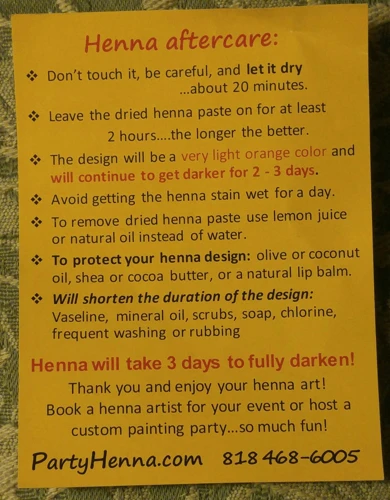
Keep the henna paste on the skin: After the paste is applied, keep it on your skin for as long as possible to get a dark stain. The longer you keep it, the darker the stain will be.
Wrap the paste: Once the paste is applied, you can wrap it with paper, cloth, or plastic wrap to keep the moisture in. The moisture helps the paste stick to the skin and helps the stain last longer.
Protect from water: Water will dilute the henna paste and may cause the stain to fade more quickly. Avoid swimming and bathing for at least 12 hours after applying the paste.
Moisturize: Once the paste is removed, it is important to keep the area moisturized to help the stain last longer. Use a natural oil, such as coconut oil, to keep the skin moist and help the stain last longer.
Avoid scrubbing or picking: Avoid scrubbing or picking at the henna stain as this can cause it to fade faster.
Avoid sunlight: Sunlight can cause the henna stain to fade more quickly. Avoid direct sunlight for at least 24 hours after applying the paste.
Avoid using chemicals: Avoid using any harsh chemicals, such as bleach or peroxide, on the henna stain. These can cause the stain to fade more quickly.
Potential Risks
Skin Irritation: Henna tattoos may cause skin irritation in some individuals. This is usually caused by an allergic reaction to the dye and can lead to itching, redness, and swelling.
Infection: If the henna paste is not prepared properly or is not completely removed from the skin, it can lead to bacterial or fungal infections.
Scarring: If the henna paste is left on the skin for too long or is applied too thickly, it can cause permanent scarring.
Allergic Reactions: Henna tattoos may cause an allergic reaction in some individuals. Symptoms of an allergic reaction include hives, itching, swelling, and difficulty breathing.
Frequently Asked Questions
What type of henna should I use?
Henna powder: This is the most commonly used form of henna and is widely available in stores and online. It can be purchased in small packages or in bulk. It is made from the dried and crushed leaves of the henna plant and is usually a bright green-brown color.
Henna paste: Henna paste is made by mixing henna powder with a liquid such as water, lemon juice, tea, or coffee. This paste is applied to the skin with a cone or cloth, and it usually takes several hours to dry.
Ready-made henna kits: These kits come with everything you need to make henna tattoos, including henna powder, a mixing bowl, applicator bottles, and instructions. The kits are a convenient option, but they can be more expensive than buying the ingredients separately.
Henna oil: This is a blend of essential oils and henna powder that is used to make henna tattoos. It is applied directly to the skin with a brush and can be used to create intricate designs. The oil helps to make the henna paste last longer, but it can be difficult to find the right blend of oils for your project.
Henna markers: This type of henna is a quick and easy way to make henna tattoos. It comes in a pen-like applicator and is used like a marker. It is not as long-lasting as traditional henna paste, but it is a great option for those who don’t have the time or patience to mix and apply henna paste.
How long should I wait for the henna to dry before I remove it?
Time is of the essence when it comes to henna tattoos. The longer you leave the henna paste on your skin, the darker the tattoo will be. Allow it to dry for at least 8-12 hours before removing it. You can test the dryness of the henna paste by touching it with a finger. If it feels dry, it is ready to be removed.
Is it Safe to Make Henna Tattoos at Home?
Making henna tattoos at home is generally considered safe. It is important to use safe and natural ingredients, such as henna powder, lemon juice and sugar. These ingredients are generally non-toxic and not known to cause any skin irritation. It is also important to do a patch test before applying the henna paste to the skin to make sure the person is not allergic to any of the ingredients. Additionally, it is important to keep the henna paste away from the eyes and other sensitive areas.
How Long Do Henna Tattoos Last?
Henna tattoos typically last 1-2 weeks, depending on the care and maintenance of the tattoo. Here are some tips to help extend the life of your henna tattoo:
- Keep the tattoo dry for at least the first 24 hours.
- Avoid scrubbing or picking at the tattoo.
- Moisturize the tattoo with a natural oil.
- Avoid direct sunlight and swimming.
- Wash your hands before touching the tattoo.
By following these tips, you can ensure that your henna tattoo will last as long as possible.
Are There Any Safety Precautions I Should Take When Making Henna Tattoos?
Wear Gloves: To protect yourself from any potential skin irritation, wear disposable gloves when handling the henna paste.
Test the Paste: Before applying the henna paste, do a patch test on a small area of skin to check for any allergic reactions.
Do Not Put Henna in the Eyes: Do not let the henna paste come into contact with the eyes.
Keep Away From Children: Keep henna paste and any other materials used in making henna tattoos away from children.
Conclusion
Making your own henna tattoos is a great way to express your creativity and create a beautiful, unique body art. With the right materials, a little practice, and following the steps outlined in this guide, you can easily create beautiful and long-lasting henna tattoos.
References
- Safety of Henna Tattoos, National Center for Biotechnology Information
- Infection Control Guidelines for Tattooing, Centers for Disease Control and Prevention
- Henna, North Carolina State University