Are you interested in learning how to build a tattoo machine? If so, this detailed step-by-step guide will help you understand the process of creating a professional-grade tattoo machine from scratch. We’ll cover the supplies needed, the tools and techniques for assembling a complete tattoo machine, and provide tips for troubleshooting any issues that may arise. With the right knowledge and practice, you’ll soon be able to build a tattoo machine that will help you create beautiful works of art. Let’s get started!
Contents
Overview of the Tattoo Machine
| Part of the Machine | Description |
|---|---|
| Frame | The frame contains all the components of the machine and is usually made of metal, plastic or a combination of both. |
| Armature Bar | This is the main component of the tattoo machine and is responsible for moving the needle up and down. |
| Coils | The coils are responsible for creating the electrical current that powers the machine and moves the armature bar. |
| Contact Screws | The contact screws are responsible for regulating the amount of power that is sent to the coils. |
| Tube | The tube holds the needle and ink in place while the machine is running. |
| Needle | The needle is the part of the machine that actually makes the tattoo. |
The tattoo machine is the primary tool used when building a tattoo gun. It is composed of several components, each of which plays an important role in the process of creating a tattoo. The frame contains all the components of the machine and is usually made of metal, plastic or a combination of both. The armature bar is the main component and is responsible for moving the needle up and down. Coils are responsible for creating the electrical current that powers the machine and moves the armature bar. Contact screws regulate the amount of power sent to the coils. The tube holds the needle and ink in place while the machine is running, and the needle is the part of the machine that actually makes the tattoo.
Gather the Supplies

Coil
A coil is the most important part of the tattoo machine. It is a cylindrical piece of wire that creates a magnetic field when electricity is passed through it. The coil is responsible for powering the armature bar, which then moves the needle.
Iron Core
The iron core is a piece of iron that sits inside the coil. It is used to focus the magnetic field created by the coil, which helps the armature bar move more efficiently.
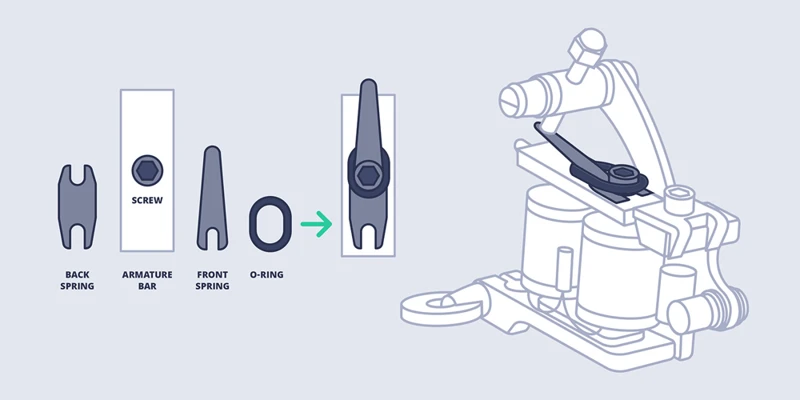
Armature Bar
The armature bar is a metal rod that connects the coils to the needle bar. It is responsible for transferring the energy from the coils to the needle bar and is an essential part of the tattoo machine.
Contact Screws
Contact screws are used to regulate the flow of electricity to the coils. They are adjustable and can be used to control the speed and power of the machine.
Tube
The tube is a hollow metal cylinder that houses the armature bar and contact screws. It is also used to protect the armature bar and contact screws from dirt and debris.
Needle Bar
The needle bar is a metal rod that holds the needle grouping. It is connected to the armature bar and is responsible for moving the needle up and down.
Needle Grouping
The needle grouping is a small piece of metal that holds the needles in place. It is attached to the needle bar and is responsible for moving the needles up and down.
Grips
Grips are the handles of the tattoo machine. They are used to control the speed and power of the machine.
Tattoo Power Supply
The tattoo power supply is the device that provides power to the coils. It is an essential part of the tattoo machine and should be chosen carefully.
Assemble the Tattoo Machine
Connect the Coils
Connect the two coils together and check if the coils are insulated properly.
Insert the Armature Bar
Insert the armature bar into the coils and make sure that it is properly secured.
Attach the Contact Screws
Attach the contact screws to the armature bar and the coils.
Connect the Tube
Connect the tube to the armature bar and the contact screws.
Attach the Needle Bar
Attach the needle bar to the armature bar and the contact screws.
Insert Needle Grouping
Insert the needle grouping into the needle bar.
Attach the Grips
Attach the grips to the armature bar and the contact screws.
Connect the Tattoo Power Supply
Connect the tattoo power supply to the coils and the needle bar.
Test the Tattoo Machine
To ensure that your tattoo machine is working properly, it is important to test it before you begin tattooing.
Step 1: Connect the tattoo machine to a power source. You will need a power supply and a clip cord to connect the machine to the power source.
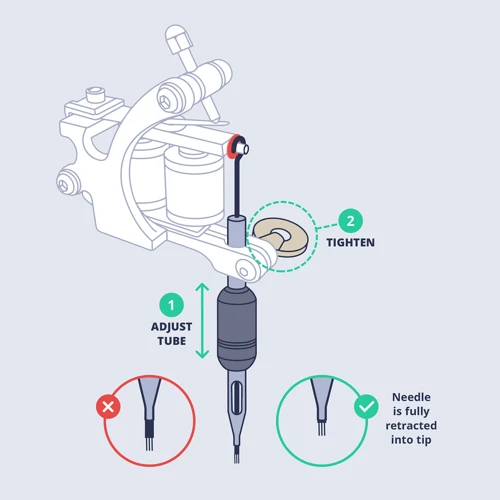
Step 2: Set the needle depth. This will depend on the type of tattoo you will be doing. Use a depth gauge to adjust the needle depth accordingly.
Step 3: Test the machine. Turn on the power supply and check that the machine is running smoothly. Test the machine on a piece of paper before using it on skin.
Step 4: Adjust the voltage. With the power supply on, adjust the voltage to the lowest setting. Gradually increase the voltage until the needle is moving smoothly.
Step 5: Test the speed. Use a timer to test the speed of the machine. Make sure that the machine is running at the speed you want.
Step 6: Clean the machine. After testing, make sure to clean the machine with a cloth and rubbing alcohol. This will help to keep your machine in good condition.
If your tattoo machine is working correctly, you can now begin to tattoo. If you find any problems with your machine, make sure to adjust it or repair it before you start tattooing.
Frequently Asked Questions
What materials do I need to build a tattoo machine?
- Coils: You will need two coils, preferably a 10-wrap and a 8-wrap. You can buy these from most tattoo supply stores.
- Armature bar: An armature bar is the component that moves the needle and can be made from brass, aluminium or stainless steel.
- Frame: The frame of the machine can be made from wood, plastic or metal. The frame should be large enough to fit the coils and armature bar.
- Hardware: You will need screws, nuts, bolts and washers to hold the frame and components together.
- Cord: You will need a power cord to connect the machine to a power source.
- Needle: A tattoo needle is needed to create the tattoo.
- Foot switch: A foot switch is used to control the power of the machine.
Can I Modify a Pre-Existing Tattoo Machine to Make it My Own?
Yes, you can modify a pre-existing tattoo machine to make it your own. Depending on the type of tattoo machine you have, there are various modifications you can make to personalize it. You can change the coil, armature bar, and other parts to customize the machine to your preferences. Additionally, you can add decorative elements such as colorful wraps and stickers to give it a unique look.
Are there any special tools required for building a tattoo machine?
Building a tattoo machine requires a few specialized tools, such as:
- Soldering iron: This is used to attach the components of the tattoo machine to the frame. It is important to use a soldering iron with adjustable temperature settings.
- Pliers: These are used to attach the coils to the armature bar and the binding post to the frame.
- Wire cutters: Used to cut and strip the wire to the right length.
- Vise: Used to hold the frame of the tattoo machine while the components are being assembled.
- Screwdriver: Used to attach the various components to the frame.
- Voltmeter: Used to measure the voltage of the tattoo machine.
It is important to use the right tools for the job, as using the wrong tools can damage the components, leading to a malfunctioning machine.
What safety precautions should I take when building a tattoo machine?
- Wear protective gear: Wear protective gear such as gloves, goggles, and a face mask when building a tattoo machine. This will protect your eyes and skin from any potential hazards.
- Avoid electric shock: Make sure to always unplug the tattoo machine before working on it. Additionally, check the connections and wiring regularly to make sure everything is working properly and not causing any electric shocks.
- Keep the machine clean: Keep the tattoo machine clean and free of any dirt, dust, or other debris that could potentially cause a malfunction. This is especially important for the motor, which can be easily damaged by dirt and dust.
- Check for sharp edges: When building a tattoo machine, be sure to check for any sharp edges and smooth them down with a file or sandpaper. This will help to prevent any potential cuts or injuries when handling the machine.
- Follow instructions: When building a tattoo machine, always follow the instructions provided. Doing so will help ensure that the machine is built correctly and safely.
How Long Will It Take to Build a Tattoo Machine?
The time it takes to build a tattoo machine can vary greatly depending on the complexity of the design, the materials used and the skill level of the builder. A basic machine can take as little as a few hours to build, while more complex machines may require days or weeks of work. Assembling the parts of the machine, including the motor and frame, is usually the most time-consuming step. The time required to complete the build will depend on the builder’s skills and experience.
Conclusion
Building a tattoo machine is an achievable goal. With the right tools, parts, and supplies, anyone can build a professional-grade machine. With patience, dedication and a little practice, anyone can learn how to build a tattoo machine.