Are you interested in learning how to put a tattoo gun together? If so, this article will provide step-by-step instructions on how to assemble a tattoo gun for beginners. Whether you are an experienced tattoo artist or just starting out, the information provided here will give you the knowledge you need to put together a tattoo gun and start inking. Keep reading to learn more.
Contents
What is a Coil Tattoo Machine?
A coil tattoo machine is a type of tattoo gun that uses electromagnetic coils to control the movement of the needle. It operates on an alternating current, which is then adjusted through a transformer to the desired voltage for tattooing. These machines are the most commonly used type of tattoo gun and are very reliable. They are easy to use and maintain and offer a wide range of needle sizes and speeds.
How to Hook Up a Tattoo Gun
The tattoo gun needs to be set up properly to ensure safety and accuracy when tattooing. To hook up a coil tattoo machine, begin by attaching the foot pedal to the power supply. Ensure the foot pedal is connected to the ‘foot switch’ port on the power supply. Next, plug the power supply into a power outlet. Then, attach the clip cord to the back of the tattoo gun. Finally, connect the clip cord to the power supply.
Once the tattoo gun is set up, you can begin to adjust the settings to operate the machine. Adjust the voltage to the desired level and ensure the needles are the correct size. You can then begin to use the tattoo gun.
How to Put a Tattoo Gun Together
Step 1: Gather All the Necessary Components
Before attempting to assemble your tattoo gun, it is important to make sure that you have all the necessary components. This includes the tattoo gun itself, a power supply, needles, ink caps, and a grip.
Step 2: Assemble the Gun
Once you have all the components, you need to assemble the gun itself. Start by attaching the power supply to the gun. Make sure to connect the power supply securely, as an improperly connected power supply can lead to poor results.
Step 3: Attach the Gun to a Power Supply
Using the power supply, connect the gun to a power source. Make sure that the connection is secure and that the power supply is set to the correct voltage.
Step 4: Connect the Needle to the Gun
The next step is to connect the needle to the gun. Make sure that the needle is securely connected to the gun and that it is the correct size for the job at hand.
Step 5: Test the Gun
Once the gun is assembled, you should test it to make sure that it is working correctly. Make sure to test it in a safe environment, such as on a piece of fruit or a piece of paper.
Step 6: Attach the Grip
The next step is to attach the grip to the gun. Make sure that the grip is securely attached and that it is comfortable to hold.
Step 7: Adjust the Voltage
Finally, you should adjust the voltage of the power supply. This will ensure that the machine is operating at the correct voltage for your specific needs.
Assembling a tattoo gun can seem intimidating, but it is actually quite simple once you get the hang of it. With the right components and steps, you can easily assemble a tattoo gun and get started on your next masterpiece.
How to Hook Up a Tattoo Gun
Step 1: Attach the Clip Cord to the Gun
Connect the clip cord to the back of the gun and make sure it is secured. Once the clip cord is attached, you can begin hooking up the power supply.
Step 2: Connect the Clip Cord to the Power Supply
Plug the clip cord into the power supply and make sure it is securely fastened. Make sure the power supply is turned off before plugging it in.
Step 3: Test the Gun
Once the gun is securely connected to the power supply, turn the power supply on and test the gun. Make sure the gun is functioning properly before beginning a tattoo.
When setting up a coil tattoo machine, it is important to make sure all connections are secure and the power supply is functioning properly. Following these steps will ensure that you have a safe and successful tattoo session.
How to Set Up a Coil Tattoo Machine
Step 1: Unpack the Machine
Unpack the tattoo machine from its box and check the contents: a coil machine, power supply, needle and foot pedal. If something is missing or damaged, contact the supplier.
Step 2: Assemble the Machine
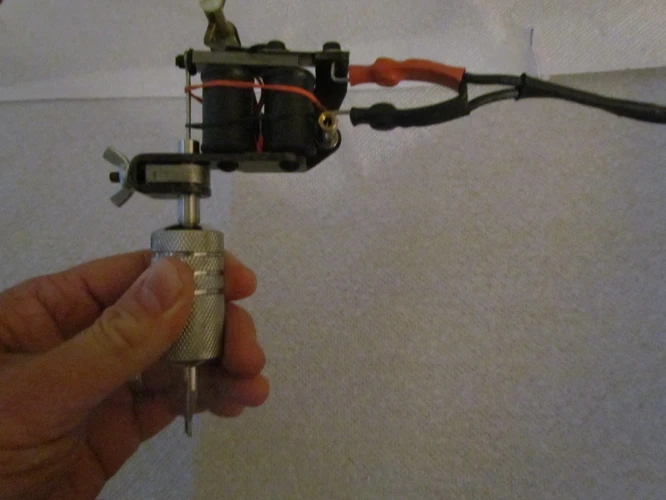
Assemble the coil machine by attaching the frame to the armature bar and tightening the screws. Make sure the frame is tightly secured.
Step 3: Attach the Machine to the Power Supply
Attach the coil machine to the power supply by connecting the clip cord from the machine to the power supply. Make sure the connection is secure.
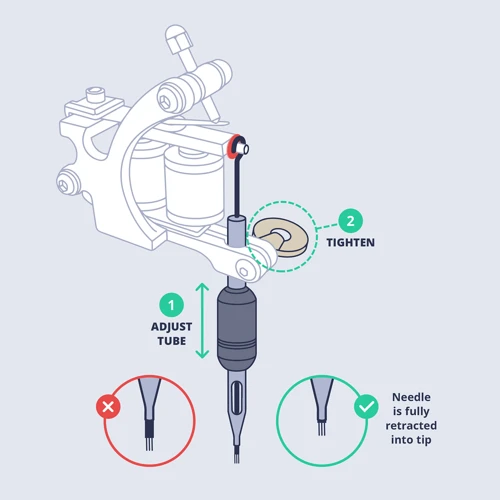
Step 4: Connect the Needle to the Machine
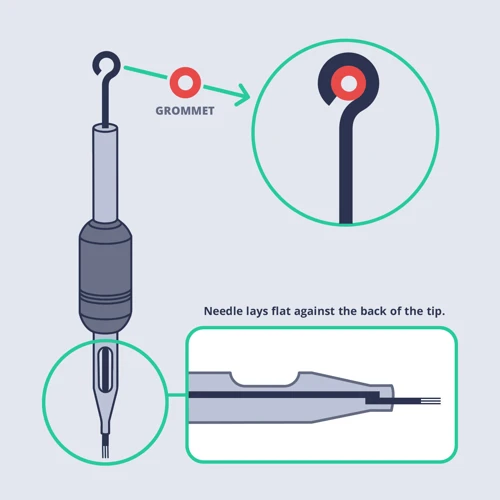
Connect the needle to the machine by inserting it into the tube vice and tightening the set screws. Make sure the needle is secure.
Step 5: Test the Machine
Test the machine by turning it on and pressing the foot pedal. Adjust the power level and listen for any abnormal noises.
Step 6: Adjust the Voltage
Adjust the voltage of the power supply according to the instructions. This will ensure that the needle is moving correctly and that the machine is functioning properly.
A coil tattoo machine is a type of device used to create tattoos. It consists of a frame, an armature bar, a power supply and a needle. Setting up a coil machine requires a few simple steps and can be done by anyone with basic knowledge of how the machine works. Following these steps will help ensure that your machine is properly assembled and functioning correctly.
Frequently Asked Questions
What Safety Precautions Should Be Taken When Putting a Tattoo Gun Together?
Always wear gloves: Wear disposable gloves to protect your hands from bacteria and other contaminants.
Clean your work area: Disinfect your work area before assembling the tattoo gun.
Use sterile needles: Use new, sterile needles that are appropriate for the type of tattoo that you are planning to do.
Be cautious with electricity: Always follow the manufacturer’s instructions when setting up the power supply and connecting the gun to it.
Check your equipment: Before using the tattoo gun, check all components to make sure they are in good working order.
What Tools are Necessary to Put a Tattoo Gun Together?
- Tattoo Gun
- Needle Cartridge
- Grips
- Tubes
- Power Supply
- Transfer Paper
- Rubbing Alcohol
- Latex Gloves
- Liner Shader Machine
- Ink Cups
These are the necessary tools for putting together a tattoo gun. The tattoo gun is the main component and is used to insert the ink into the skin. The needle cartridge is used to hold the needle in place, and the grips are used to hold the needle in place while the gun is running. The tubes connect the power supply to the gun, while the power supply is what provides the electricity to the gun. Transfer paper is used to help place the stencil on the skin, and rubbing alcohol is used to clean the skin before the tattoo is applied. Latex gloves should always be worn when handling the tattoo gun and its components. The liner shader machine is used to create the outlines of a tattoo, and the ink cups are used to hold the ink while the tattoo is being applied.
What is the best way to clean the parts of a tattoo gun after assembly?
Ultrasonic cleaner: An ultrasonic cleaner is the best way to clean the parts of a tattoo gun after assembly. It is a device that uses ultrasonic sound waves to agitate a cleaning solution, breaking up dirt and grime on the parts and leaving them clean.
Cotton Swabs: Cotton swabs can be used to clean the parts of a tattoo gun after assembly. Dip the cotton swab in rubbing alcohol and use it to gently scrub away any remaining dirt or debris from the parts.
Rag and Soap: A rag and soap can be used to clean the parts of a tattoo gun after assembly. Soak the rag in a mixture of warm water and mild soap and then use it to scrub away any remaining dirt or debris from the parts.
Dry Cloth: Once all of the dirt and debris have been removed, use a dry cloth to wipe down the parts to remove any remaining residue.
Is it Possible to Customise a Tattoo Gun?
Yes, it is possible to customise a tattoo gun. This includes customising the needle’s size, shape, depth, and speed. Additionally, the coils and power supply can be adjusted to suit the artist’s preferences. It is important to remember, however, that customising a tattoo gun requires knowledge of the tattoo gun and its components. Beginners should seek professional guidance from experienced tattoo artists before attempting to customise a tattoo gun.
What are the Differences Between a Coil and a Rotary Tattoo Gun?
A coil tattoo gun has a simple design with two electromagnets that are connected to a power supply. It uses the electrical current to move the armature bar, which causes the needle to move up and down. A rotary tattoo gun uses a motor to move the armature bar, which creates a smoother and more consistent tattoo. Coil guns are usually louder and have a shorter stroke compared to rotary guns. Rotary guns provide more control and are quieter.
Conclusion
Assembling a tattoo gun is an essential skill for any beginner in the tattooing industry. With the help of this step-by-step guide, you now have the knowledge and confidence to properly put together a tattoo gun. Remember to be patient and take your time when assembling and disassembling the gun parts. With practice, you will be able to quickly and easily put together a tattoo gun.